Adorable Easter Crafts for Kids and Grown-Ups Alike

"Hearst Magazines and Yahoo may earn commission or revenue on some items through these links."
There's nothing like an afternoon spent crafting together as a family. It helps cement memories your little ones will cherish and also to establish meaningful Easter traditions. This spring, besides just a morning Easter egg hunt followed by a delicious Easter brunch (including a few springs sips of course), we encourage you to kick off your festivities with a few of our favorite easy Easter crafts that both kids and adults will enjoy making. These DIY ideas are as inexpensive as they are fun (many of them are made with items you probably already have in the craft bin)—plus, the finished products make for cute spring decorations that will brighten up many of the rooms in your house!
Maybe you want to go for an all-out, full-on crafting extravaganza that'll steal the show in a fun, festive, and pastel-y way, think cute bunny ear headbands or party hats decorated with rabbit faces. Or is subtle is more your style?? Then you might want to opt for salt dough Easter eggs you can hang on your Easter tree, bright, cheerful tissue paper "chicks" that can sit by the centerpiece on your dining table, or an easy Easter wreath made of paper that'll cost you less than $8 to put together. The best part? No matter what project you pick, each craft doubles as inspired home décor that'll elevate your entire holiday. Hoppy crafting and happy Easter!
P.S. Check out our handy guide on how to dye Easter eggs!
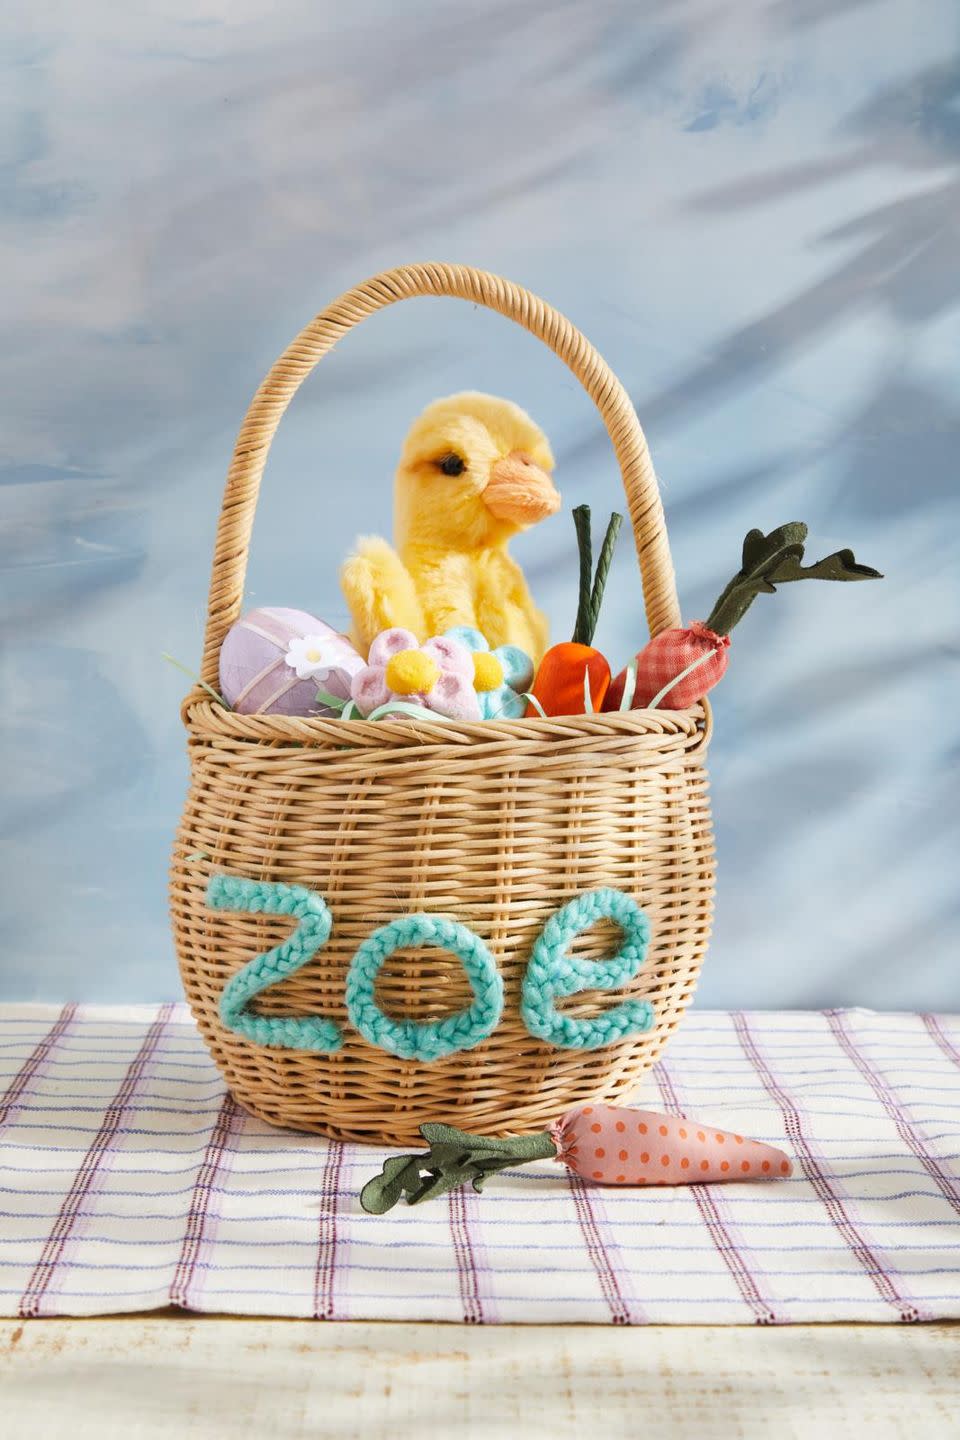
Personalized Easter Basket
Use yarn or string to personalize an Easter basket with a name or, for longer names, just use initials.
To make: Braid together three lengths of chunky weight yarn or twine, holding the ends together with a dab of hot glue. Form braid into desired letter and trim excess lengths, folding end under and holding in place with hot glue. Repeat as needed. Glue braids onto a basket forming into letter shapes as you go.
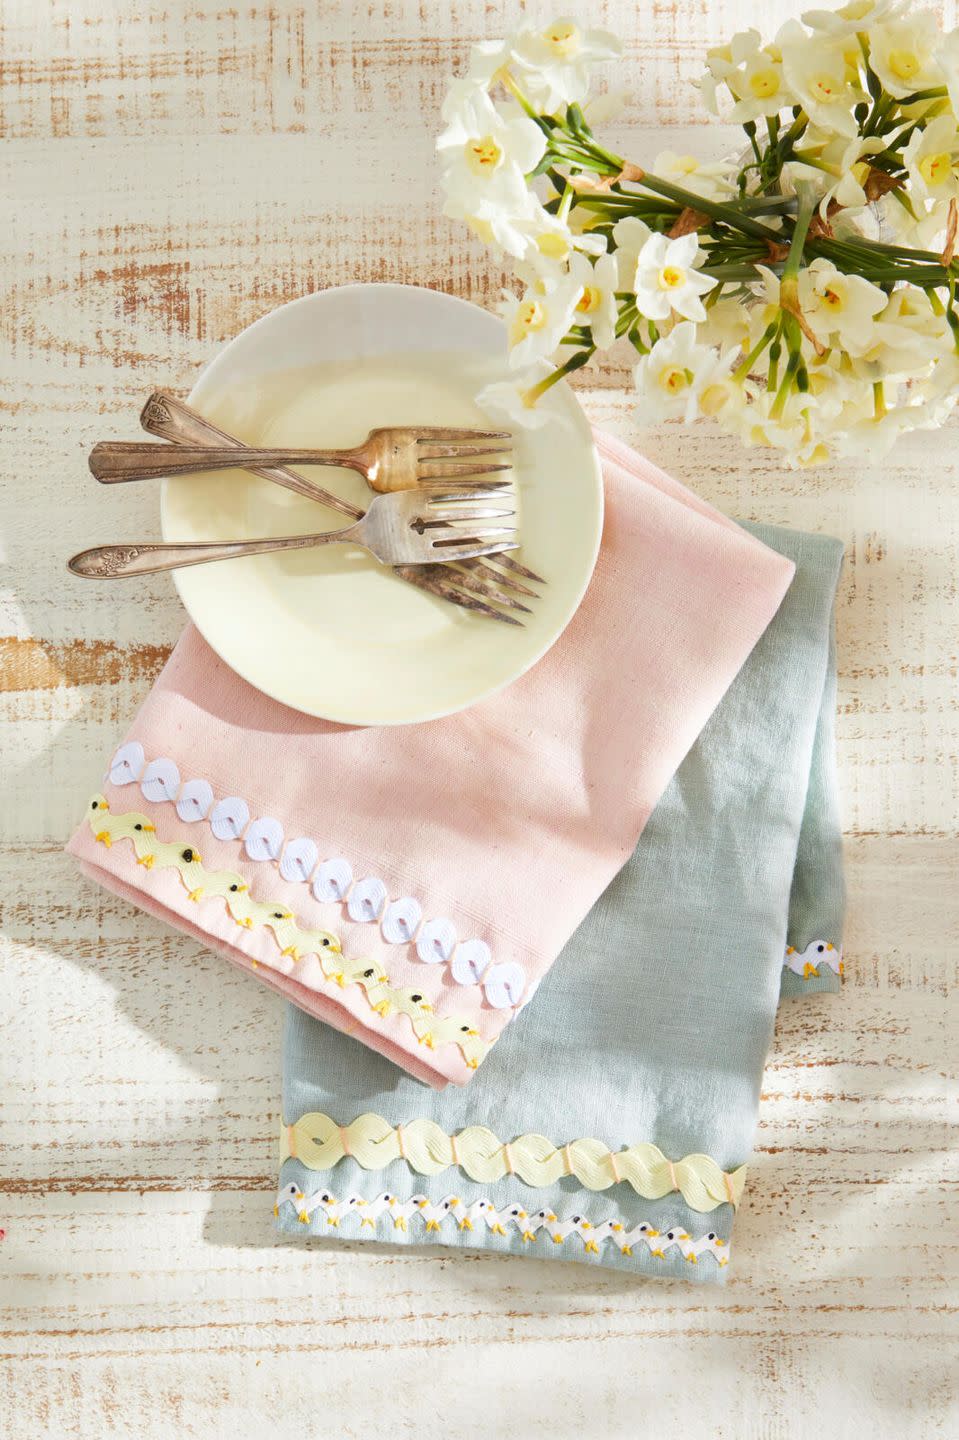
Rick Rack Easter Napkin Trim
Add a special spring detail to napkins just using rickrack and embroidery thread. We guarantee that your table will have never looked so good!
To make the chicks: Use straight pin to pin the rickrack along the edge of a napkin. Attach the rickrack to the napkin using a whipstitch and a thread that is close to the same color at the rick-rack. Use a few strands of black embroidery thread and a French Knot to create the chick’s eyes in the center of each “hill.” Use a few strands yellow embroidery thread and a back stitch to create the beak and feet.
To make the eggs: Weave two lengths of rickrack together. Whip stitch in place with your choice of embroidery thread.
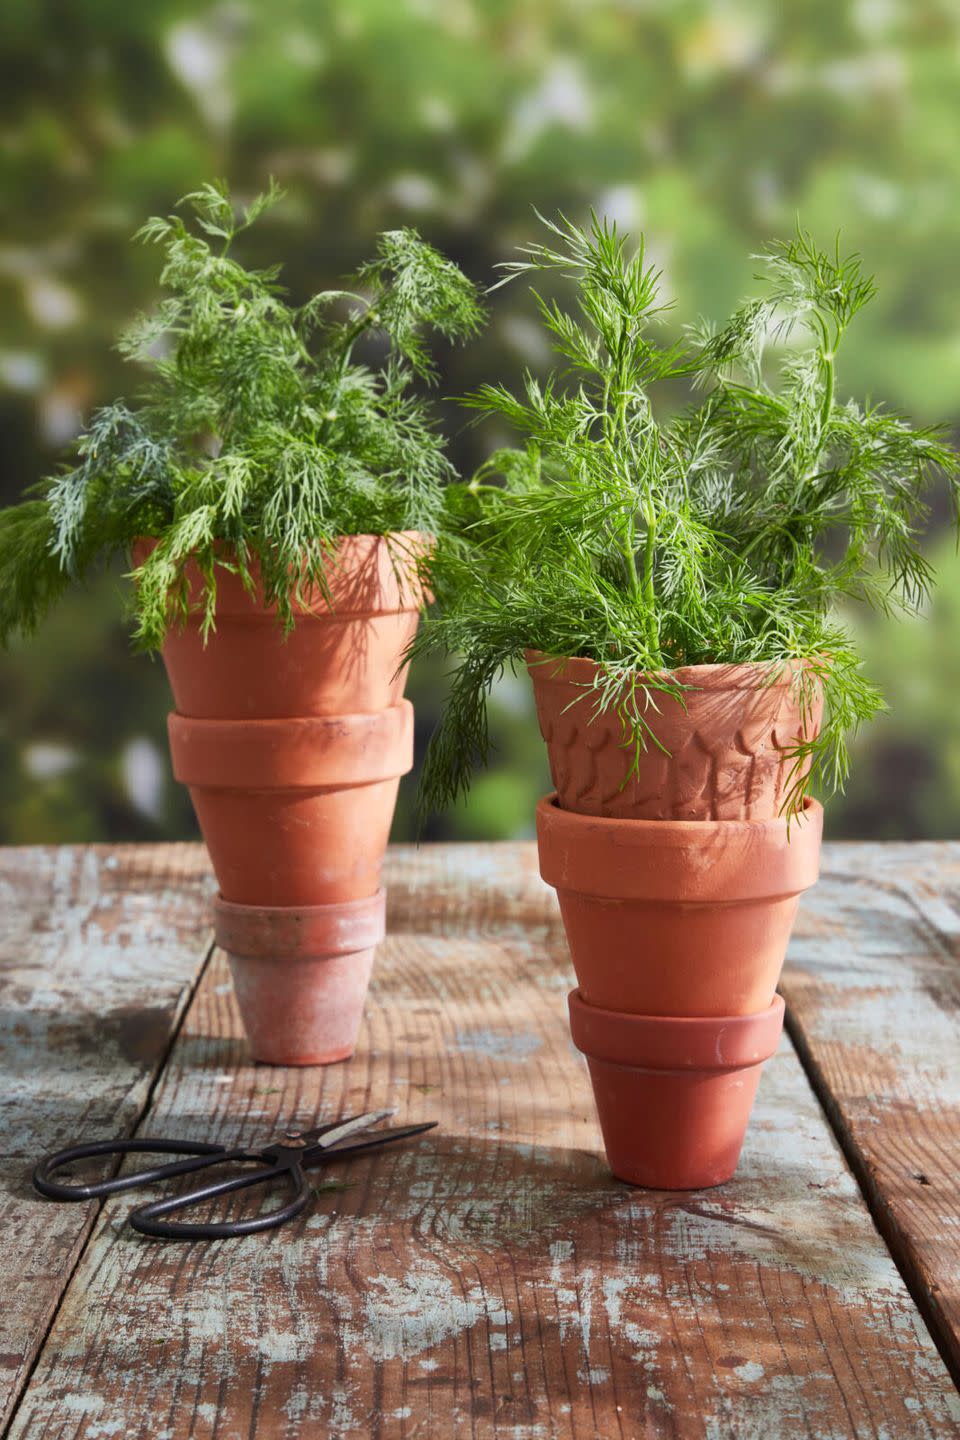
Ceramic Pot Carrot Stack
The natural color of terracotta plus a bundle of fresh dill help transform the garden bench staple into the cutest Easter decor.
To make: Stack three terracotta pots, with the smallest on the bottom and the largest on the top, to create a carrot shape (you can put rocks in the bottom pot to steady the stack, if desired). Place a piece of damp floral foam in the top pot and fill with dill sprigs to mimic carrot tops.
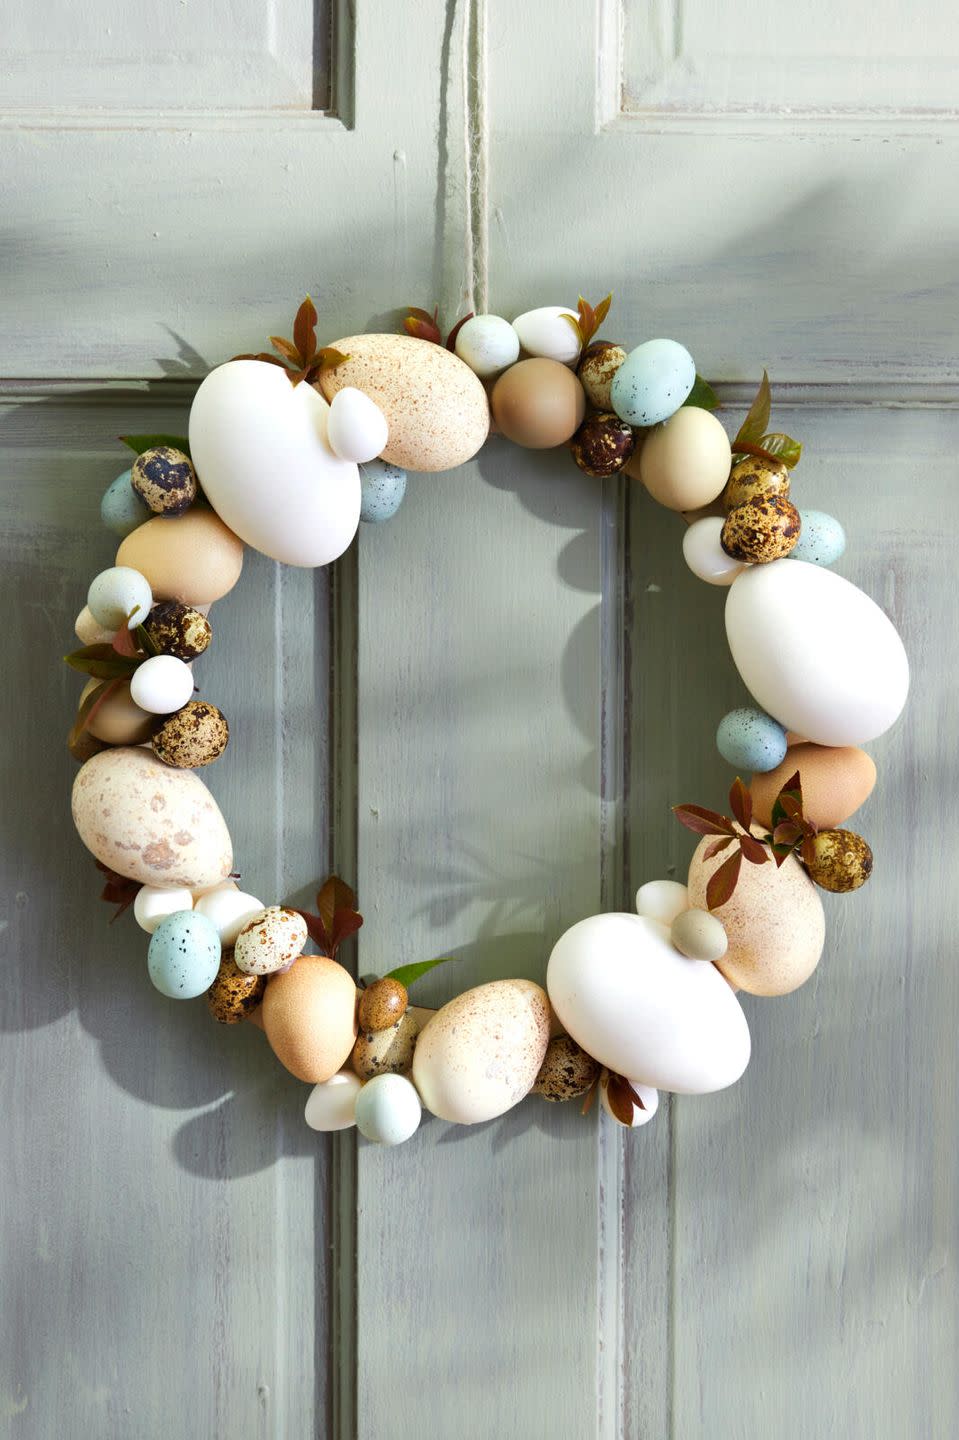
Egg Wreath
Hung on the front door, this egg wreath will great guests in style.
To make: Tie a length of twine around a 12-inch biodegradable craft ring, this will be used to hang the wreath. Attach fake or blown real eggs (we used a combination of both) such as goose, chicken, quail, and duck eggs using hot glue. Nestle greens throughout the eggs, hot gluing them in place, if desired. Hang from twine.
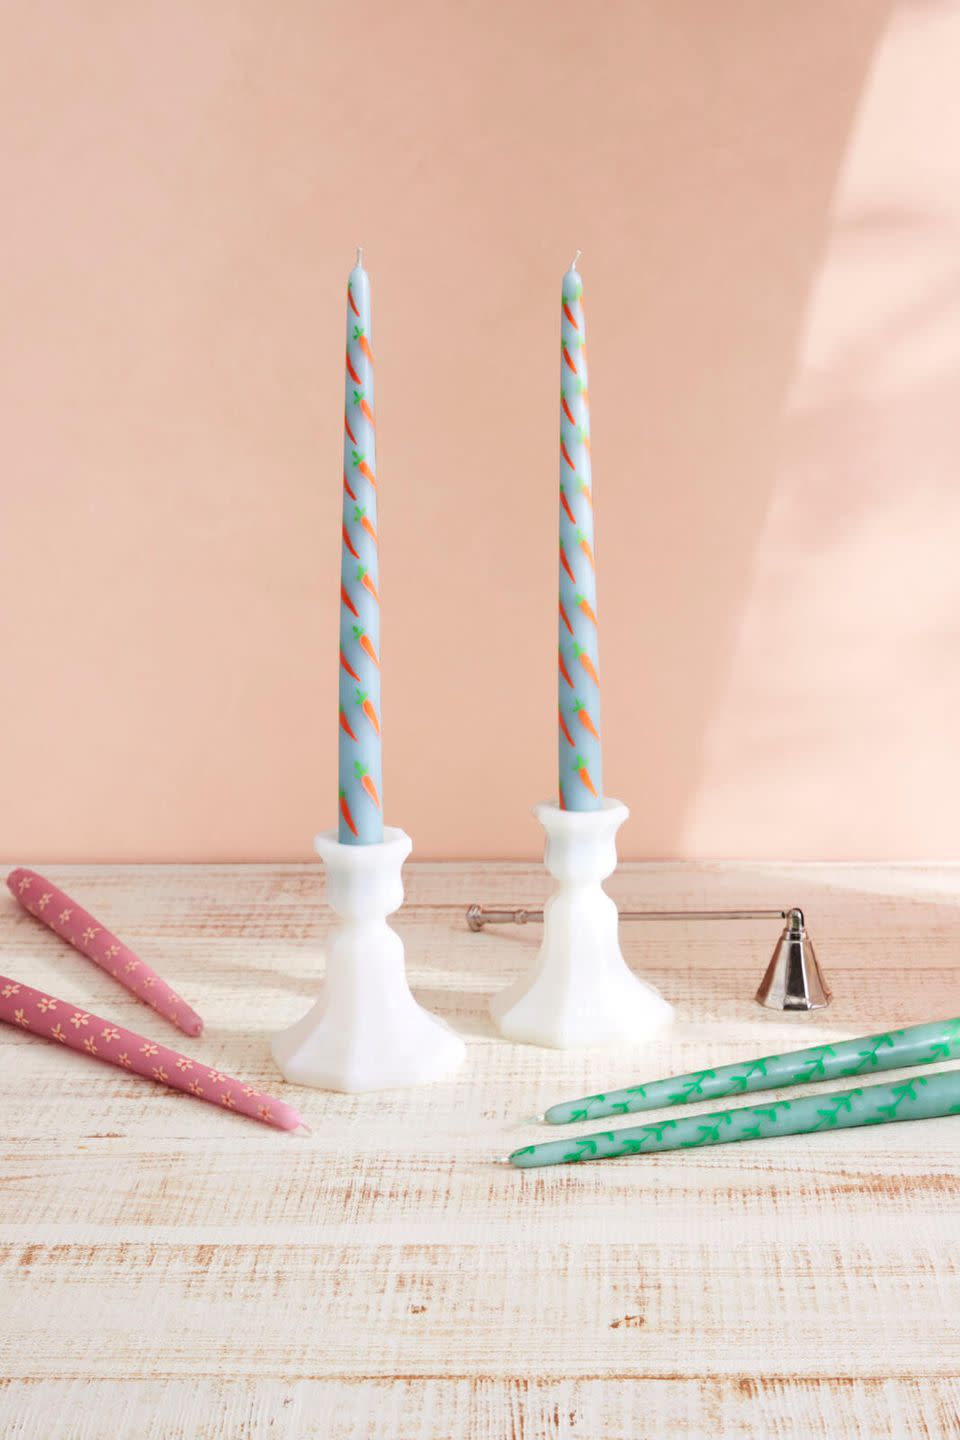
Painted Pastel Candlesticks
These gorgeous DIY painted candlesticks will add timeless flare to your holiday table.
To make: Use acrylic paint pens to draw spring or Easter designs on pastel taper candles. We did carrots, flowers, and green vines. *Note, the paint can be rubbed off while still wet so don’t worry about making mistakes.
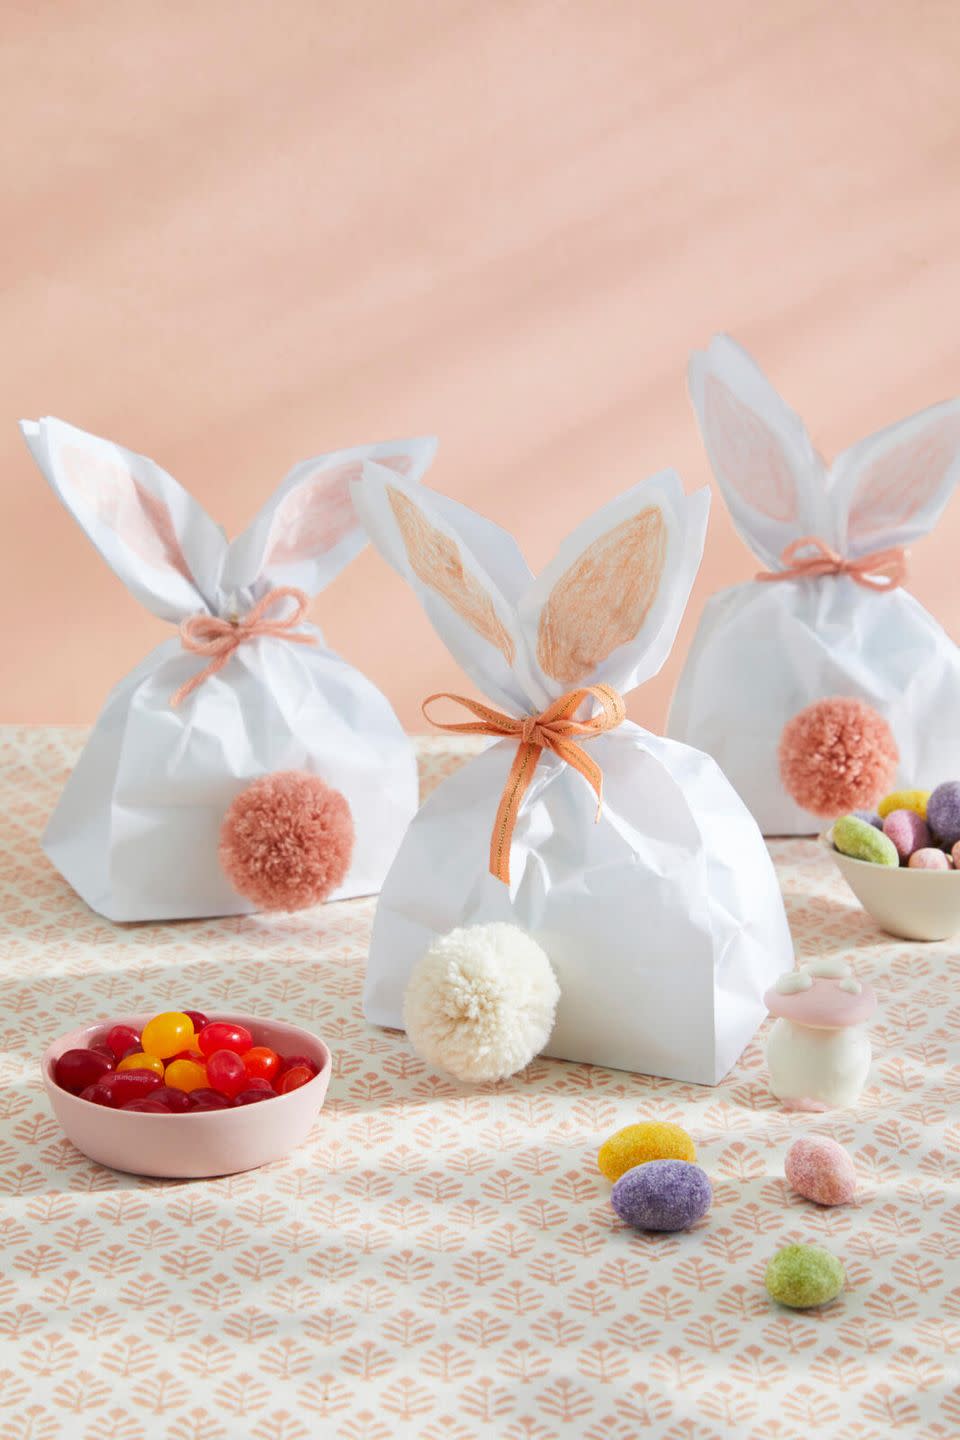
Bunny Treat Bags
Fill these bunny bags with all your favorite Easter treats. They're deal for party favors or for a special treat at the each place setting at the kids' table,
To make: Lay a white paper bag flat on a surface. Draw a 3-inch-tall “V” from the corners of the bag down toward the center of the bag. Cut out the “V”, forming the bunny ears. Use a pink colored pencil to fill in the pink interior of the ear. Unfold the bag and fill it with easter treats. Tie a length of ribbon or yarn around the bag, below the ears, cinching the bag tight. Make or buy a small pom-pom and attach it to the bottom of the bag to create the bunny tail.
Shop Now
Bunny Champagne Garnish
Add some bling to your cocktail coupes with an oh-so-cute strawberry bunny.
To make: Cut very small rabbit ears from watercolor paper. Use a pink colored pencil to fill in the pink interior of the ear. Cut the top 1/4 to 1/3 off a strawberry. Thinly slice, discarding (aka eating) the outer pieces so that you are left with a piece that is flat on both sides. Use a paring knife to cut two small slits in the top of the berry, on either side of the point; insert the ears. Cut a small slit in the center of the bottom of the berry, slide onto the rim of the glass.

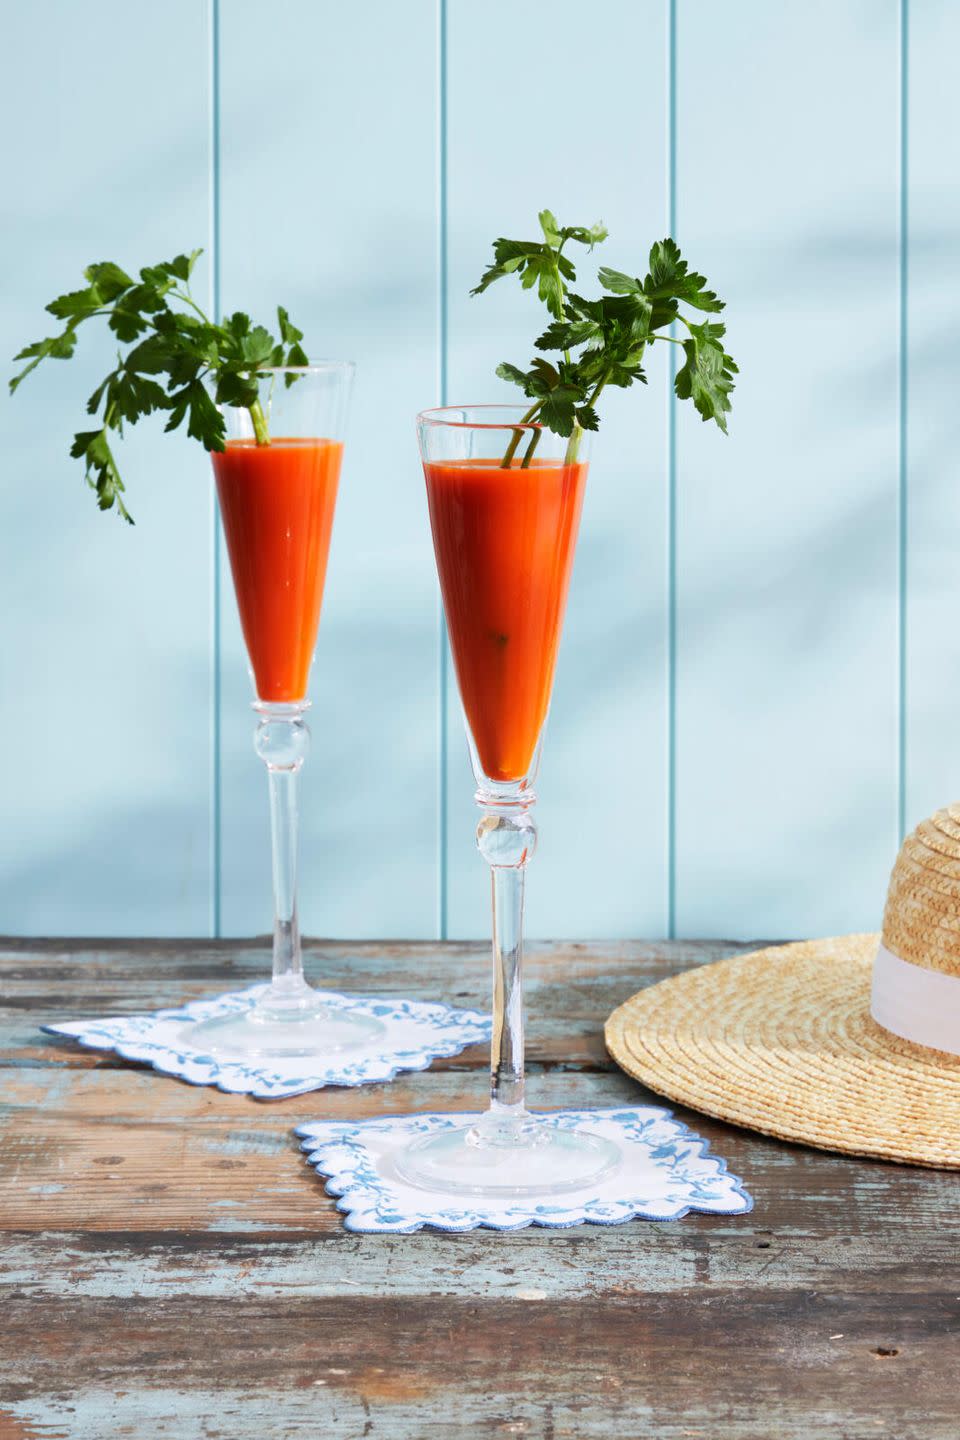
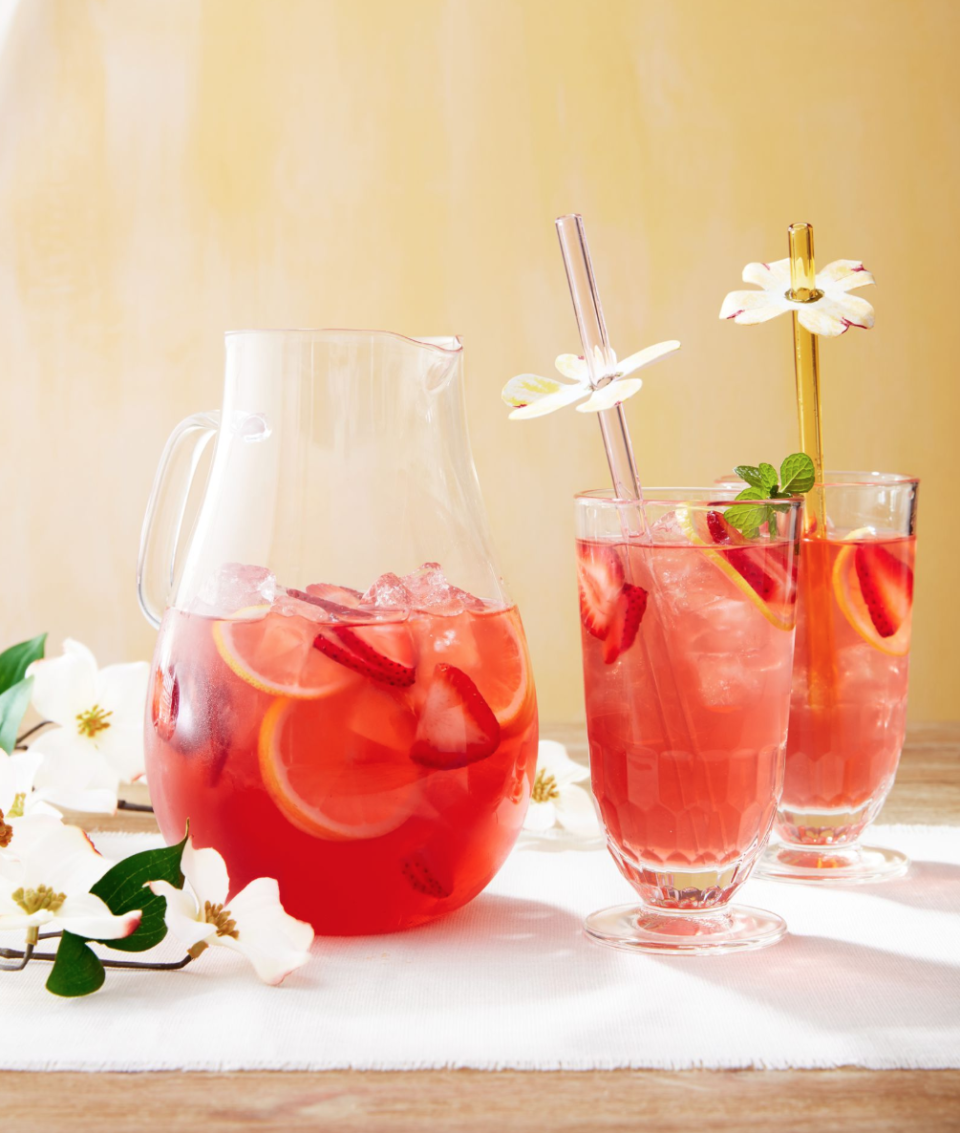
Carrot “Cocktail”
Kids will have fun drinking a carrot at breakfast on Easter morning, especially out of fancy glasses. Adults can add a glass of something sparkly if desired.
To make: Pour carrot juice into a tall champagne glass. Top with flat-leaf parsley sprigs to mimic carrot tops.
SHOP CHAMPAGNE FLUTES
Bunny Pom-pom Garland
Hung on a bench or bed in a kids room, this sweet craft will get everyone in the family excited for a visit from the Easter bunny!
To make: Use a white medium weight yarn, such as a Worsted or Aran, to make small, medium, and large sized pom-poms. Thread a length of twine or string through the center of the pom-poms, spacing them as desired. Cut rabbit ears from white and pink felt, attaching the pieces together with fabric glue. Hang using small nails or push pins.
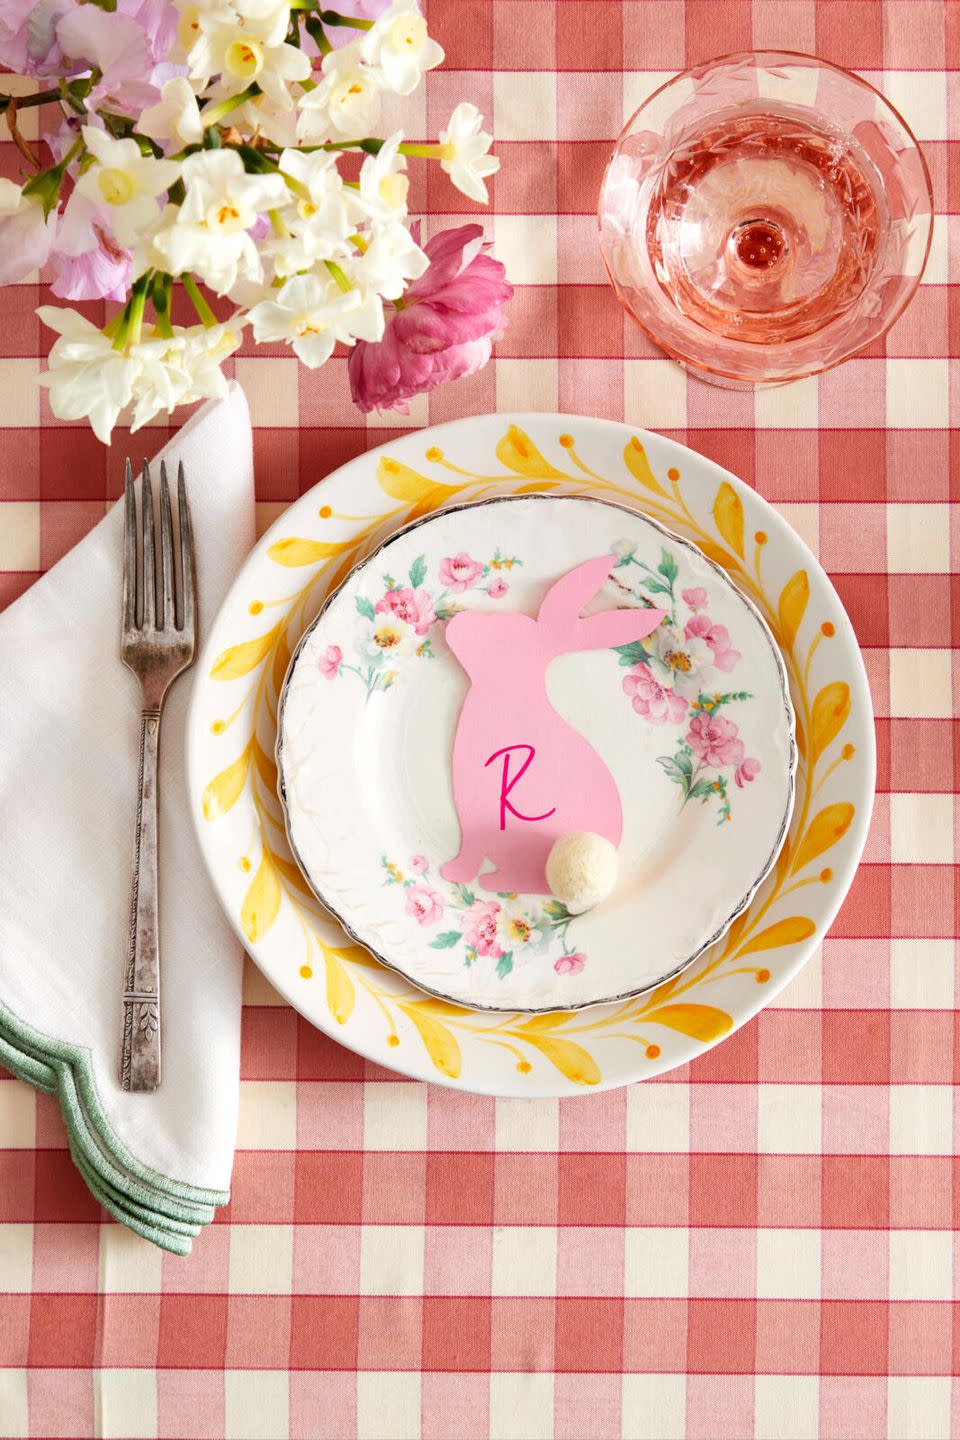
Bunny Placecard
Guest will come hop hoping to the table when they spy these sweet paper placecards. Use first and last initials if needed to help guests find their place.
To make: Cut a bunny shape from pink craft paper (you can find free silhouettes at vector4free.com). Write an initial or name on one side of the bunny in pen. Attach a small felt pom-pom or make one using white yarn; attach with hot glue.
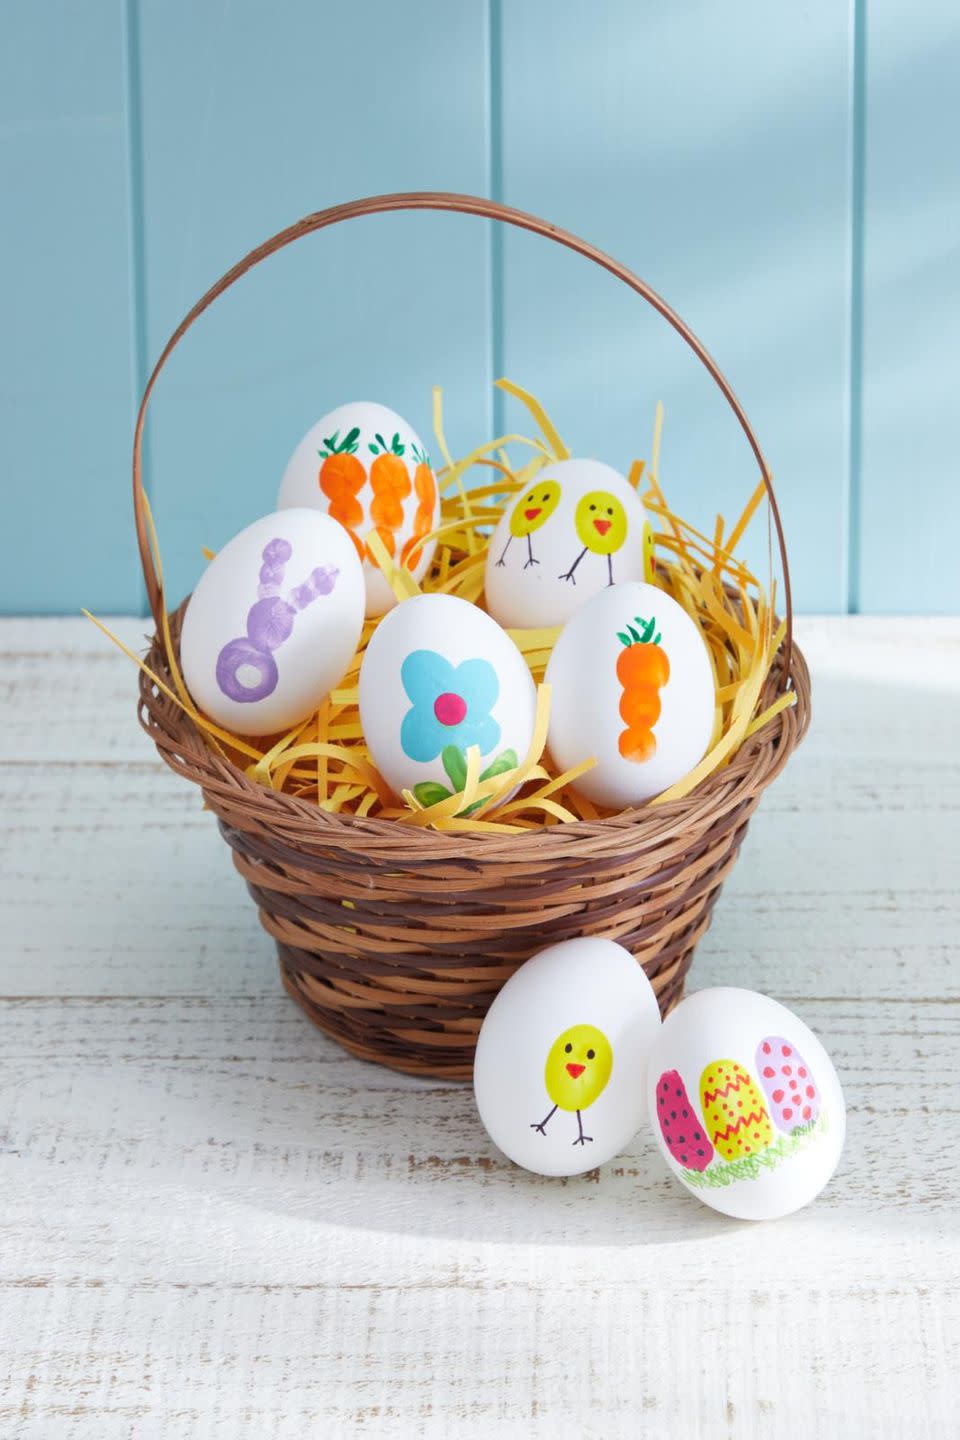
Fingerprint Easter Eggs
This is a perfect craft to keep the kids busy while you are preparing Easter brunch!
To make: Have kids dip their fingertips in craft paint and gently press them onto blown real eggs or white wooden eggs. Allow to dry completely. Once dry use acrylic paint pens or Sharpies to add details, such as a chick face and legs, carrot tops, and egg decorations. Once dry nestle in an easter basket.
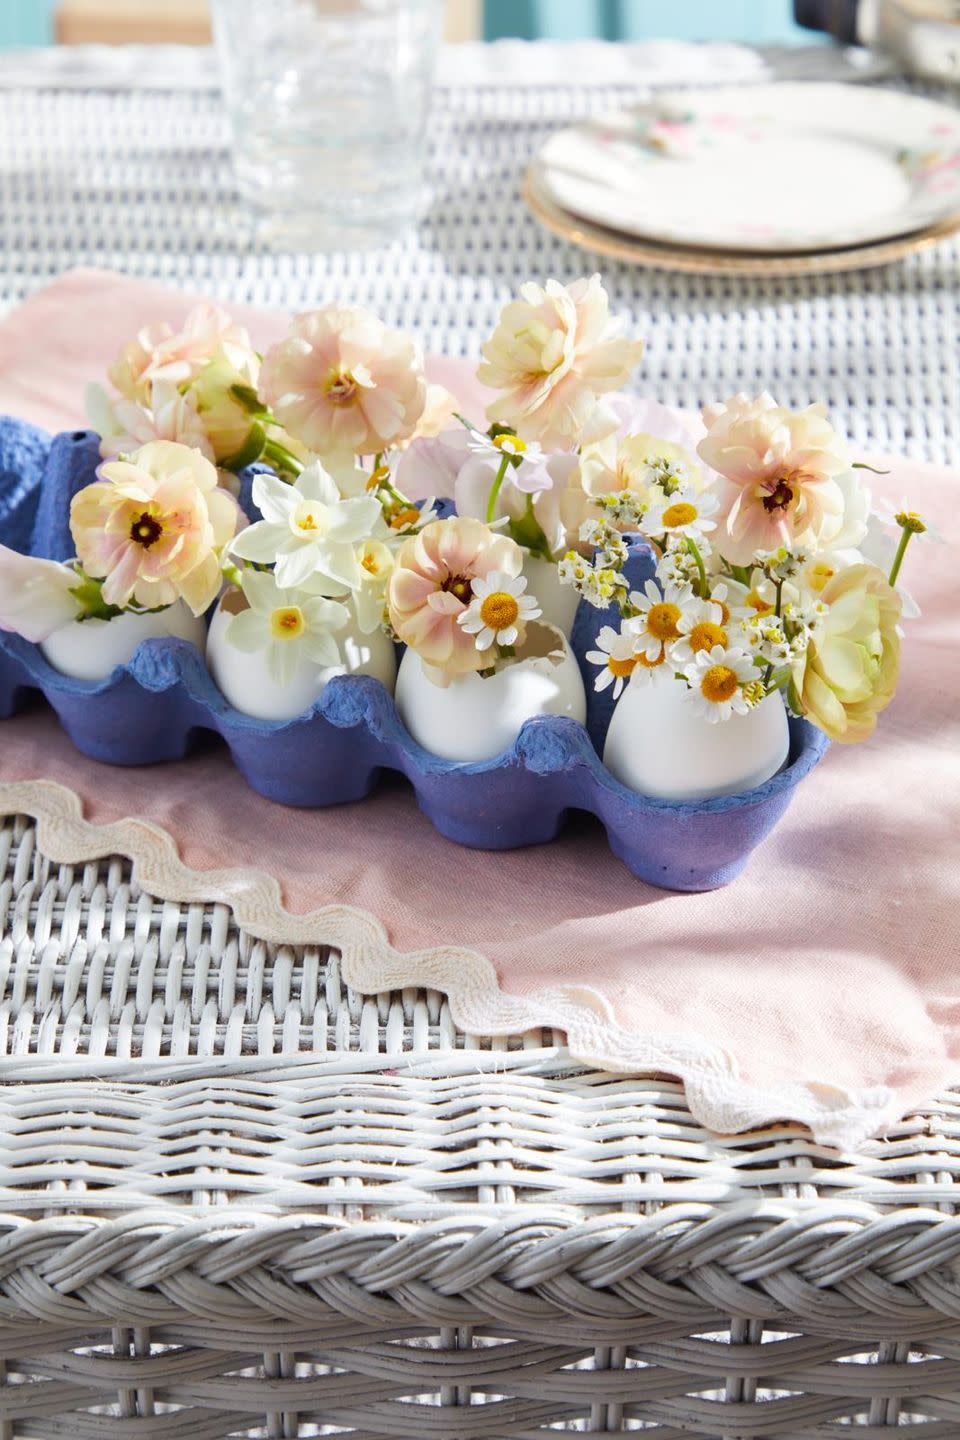
Egg Flower Cups
Eggs make the perfect perch for a pretty bouquet of small spring flowers. Set in eggs cups and use as party of your centerpiece or place them in a colorful egg carton next to the Easter brunch buffet.
To make: Use a serrated knife to cut off one end of an egg; discard the end. Rinse the shell with warm water and a few drops of distilled vinegar. Repeat as desired. Fill shell halfway with water and desired flowers. Display in an egg carton or egg cups.
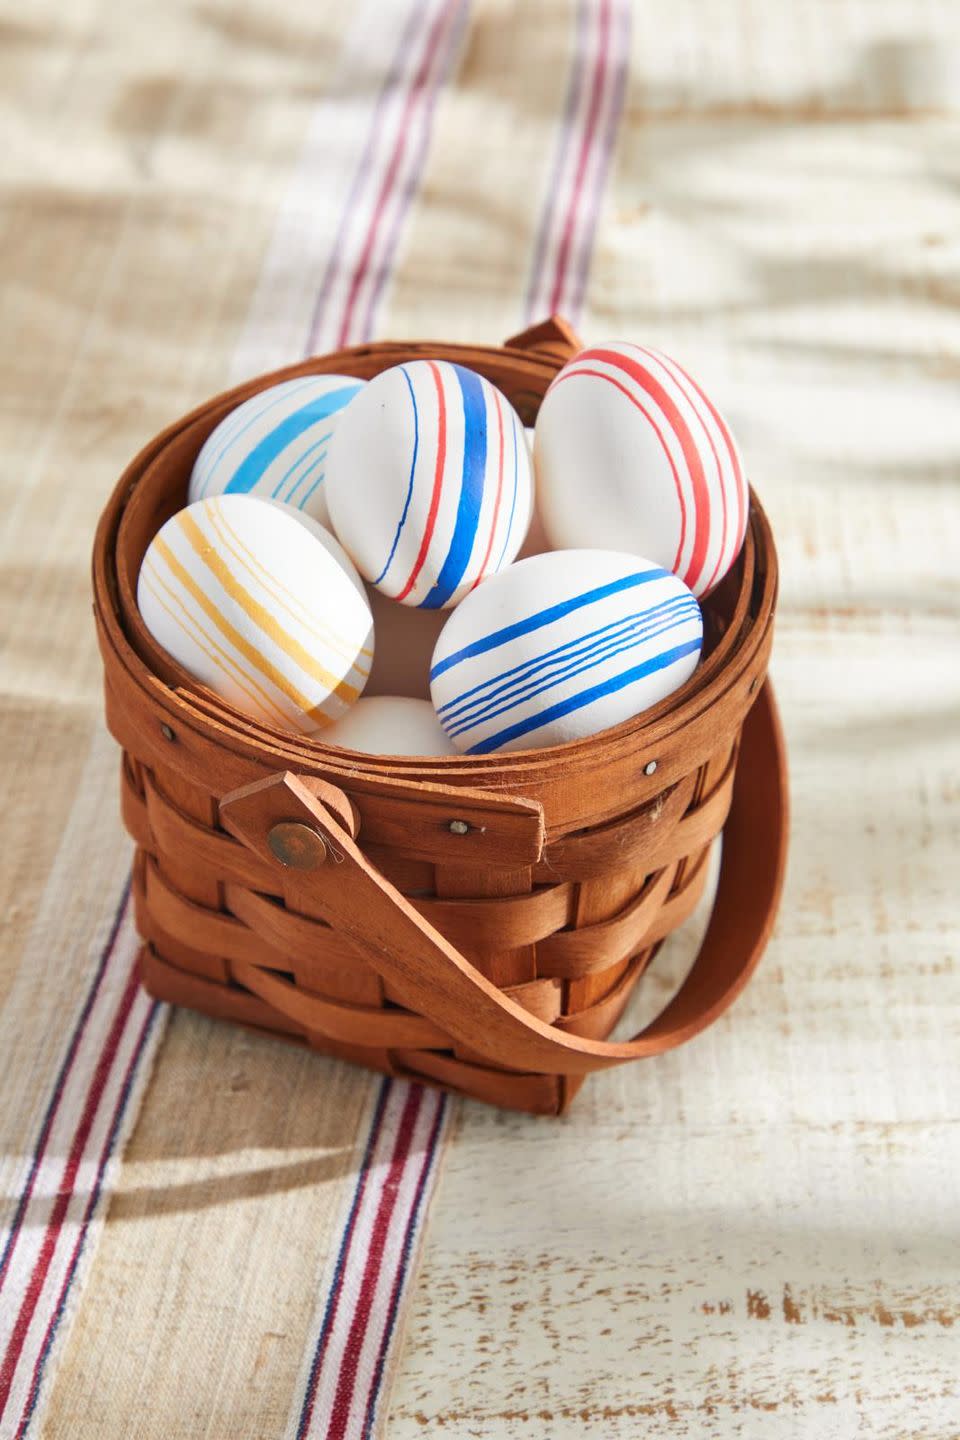
Grain Sack Eggs
Make eggs to match the decor of your house. We know you have grain sacks scattered around somewhere!!
To make: Place a blown or white painted wooden egg in an egg decorating lathe. Use acrylic paint pens or sharpies to draw lines on the eggs in varying widths. Once dry remove from the lathe.
DIY Bunny Basket
Send the kids off to hunt for eggs with the cutest basket around!
To make: Cut bunny ears from white and pink craft paper; attaching the two with craft glue. Attach the ears to the inside of the basket with hot glue. Attach two black buttons for eyes. Use pink twine, thin ribbon, or leather strips to create whiskers, attaching it with hot glue. Use a pink button to create the nose and to cover the inside ends of the twine.

Good Egg Wreath
Hatch a plan for a festive spring door with a DIY egg wreath.
To make: Use hot-glue to attach small bunches of hay and hollowed out celadon and speckled quail eggs to a 15-inch grapevine wreath.

Egg Tree
The German tradition of decorating trees dates back centuries. This one holds court in a vintage tea tin.
To make: Fill a tea tin with floral foam and insert blooming branches (here, dogwood). Hang dyed blown or painted wooden eggs using a length of ribbon looped around the egg and held in place with a wooden craft bead.

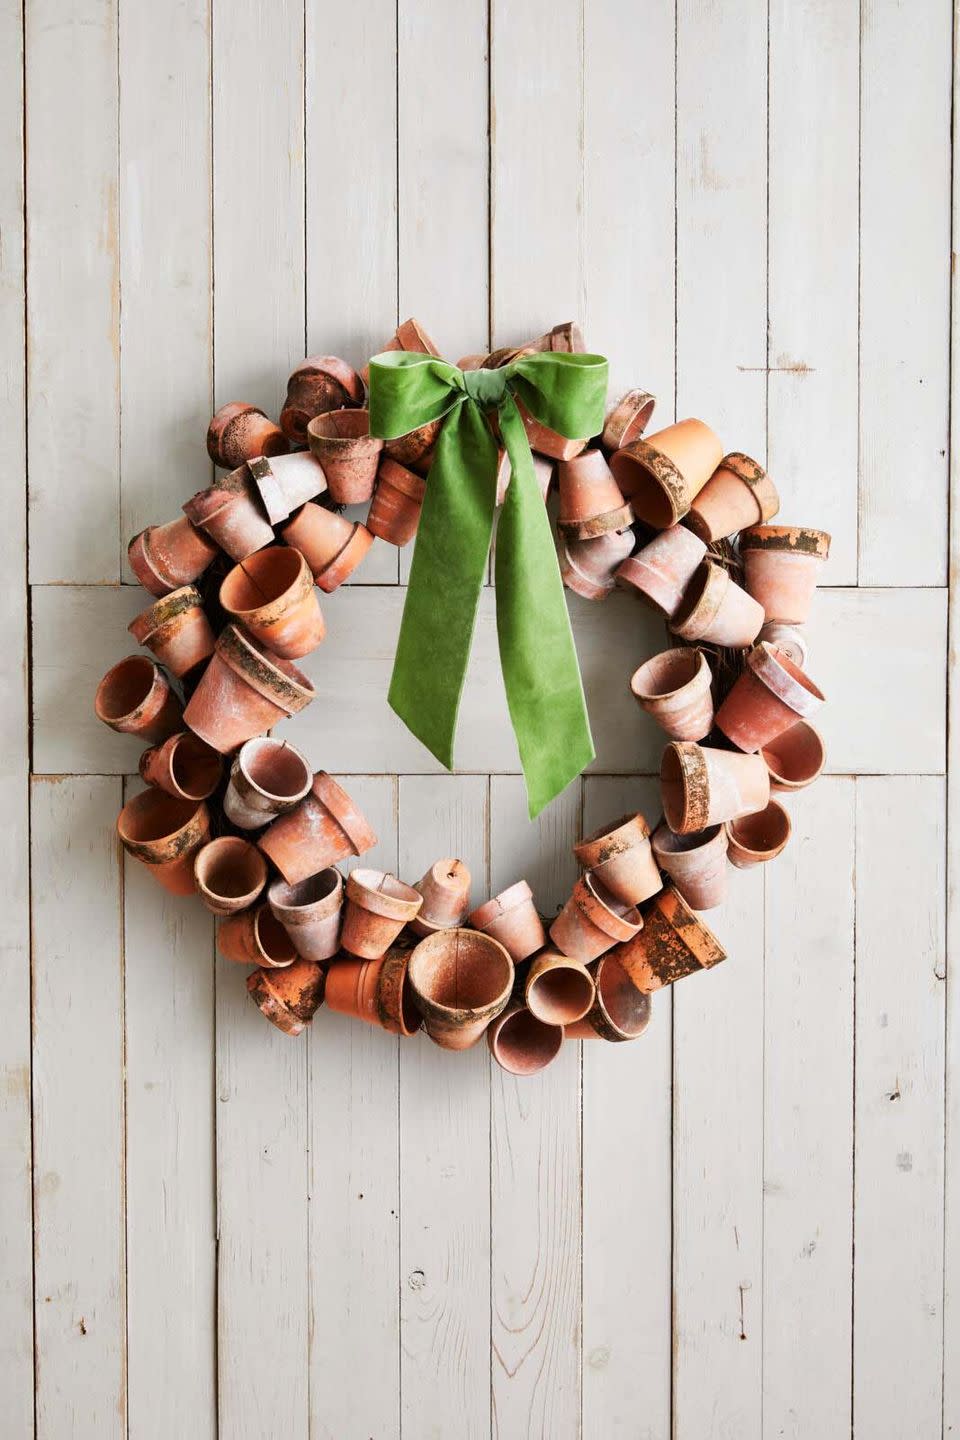
Terra Cotta Wreath
Make this multi-seasonal wreath extra special for Easter by filling a few of the pots with moss and fake robin's eggs.
Get the instructions here.
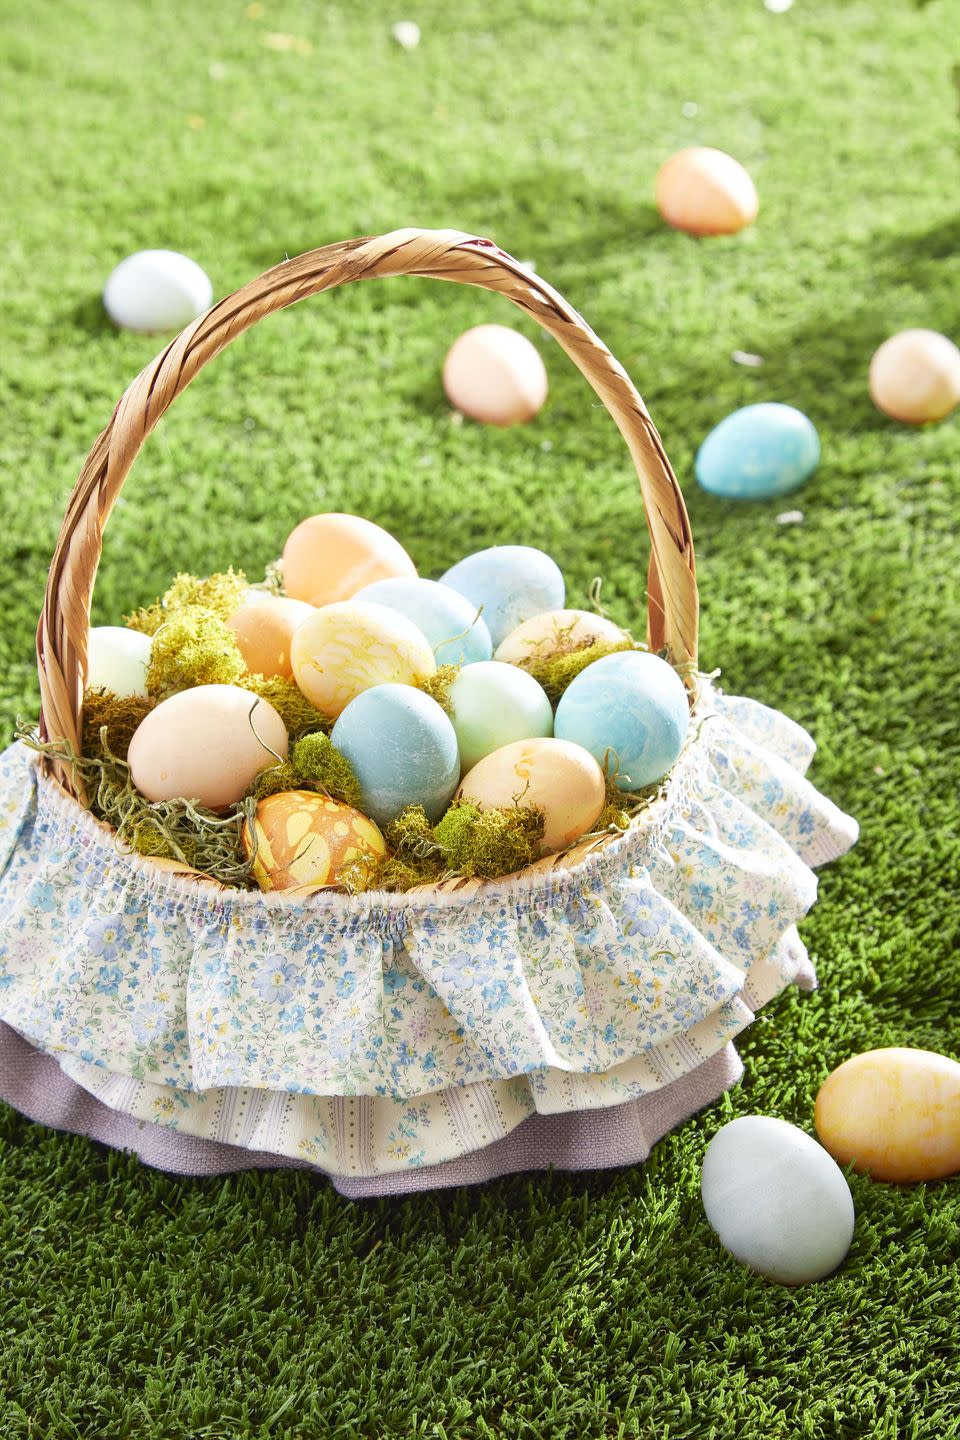
Easter Basket with Frilly Flair
Give a tired Easter basket the Sunday-best treatment by adding a trio of fabric ruffles.
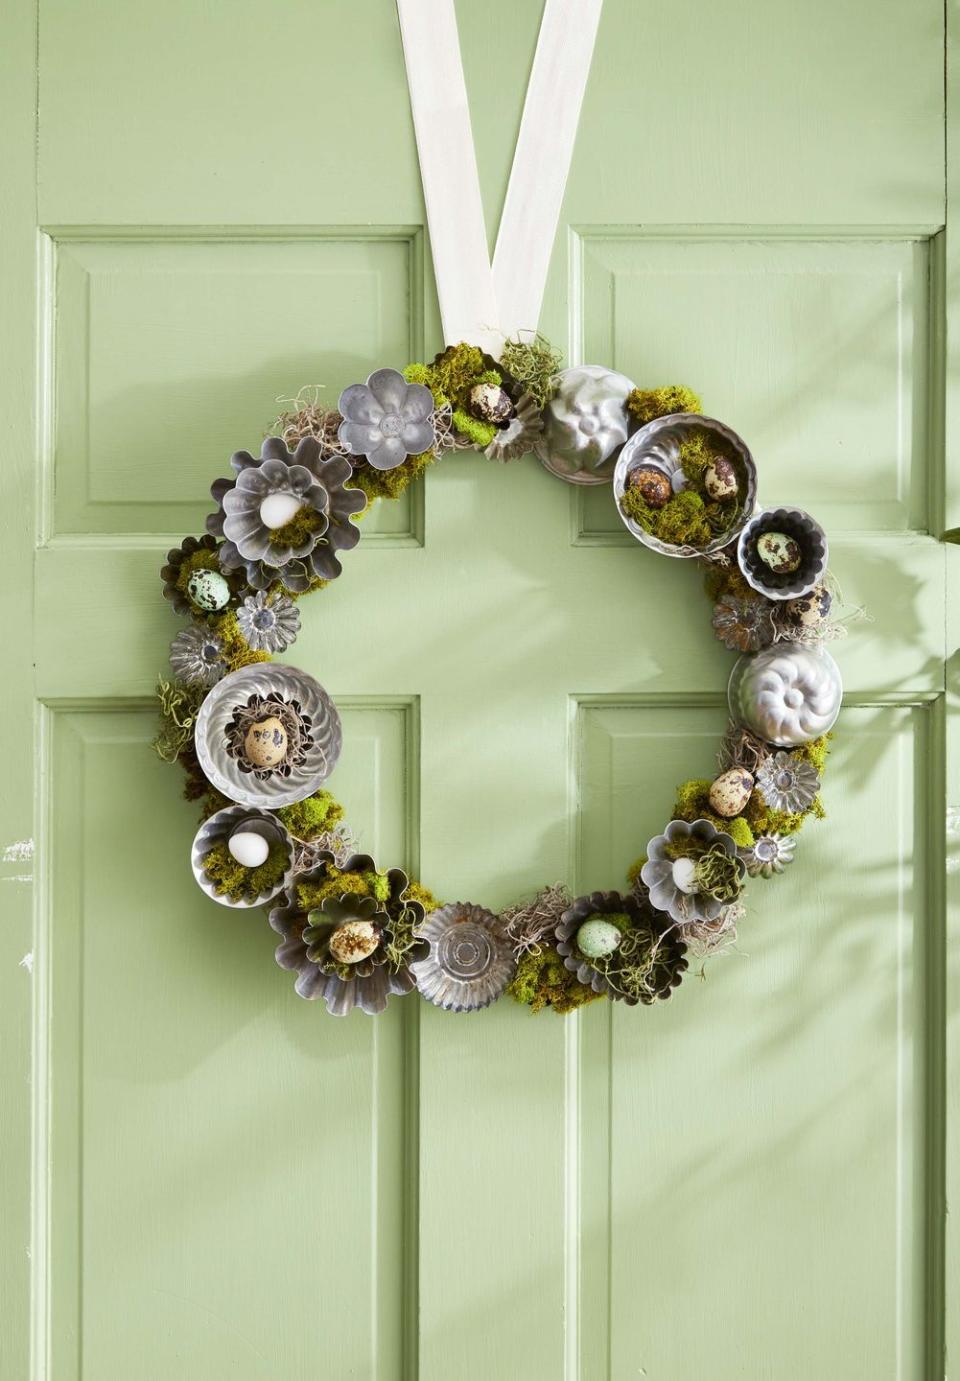
Mossy Nest Wreath
Adorn the door with this in season beauty made from mini tart tins and moss.
To make: Wrap a wire wreath form in ribbon and loop an additional piece around the top for hanging. Attach tart tins, moss, and quail eggs with hot-glue.
DIY Candy Stands
Serve seasonal candy and cookies on DIY pedestals.
To make: Set decorative plates or shallow bowls on overturned (or upright) footed dishes, candlesticks, or sugar bowls. Use museum wax to hold the pieces together.

Carrot Garland
Transform orange fabric scraps (or even flannel shirts) into seasonal swag. Trace templates onto fabric, cut out, and sew together as instructed on template. Wrap twine around the neck of the carrots and hang from a buffet or mantel.

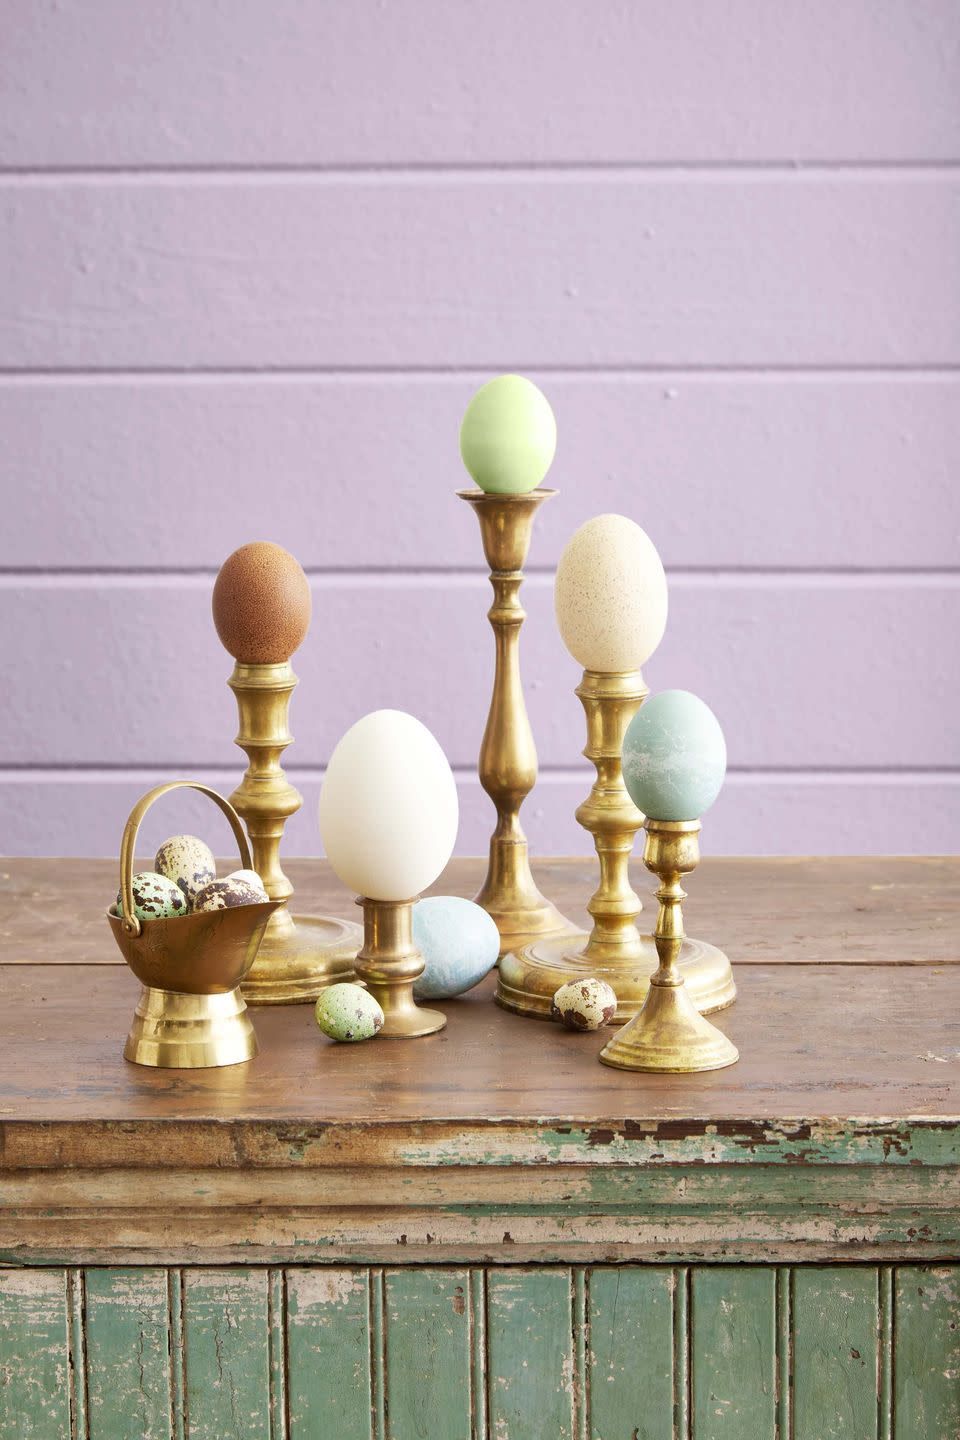
Brass Candlestick Egg Display
Place decorative eggs in a mix of sizes and colors on vintage brass or glass candlesticks to create a festive sideboard display. Keep eggs secured using museum wax.
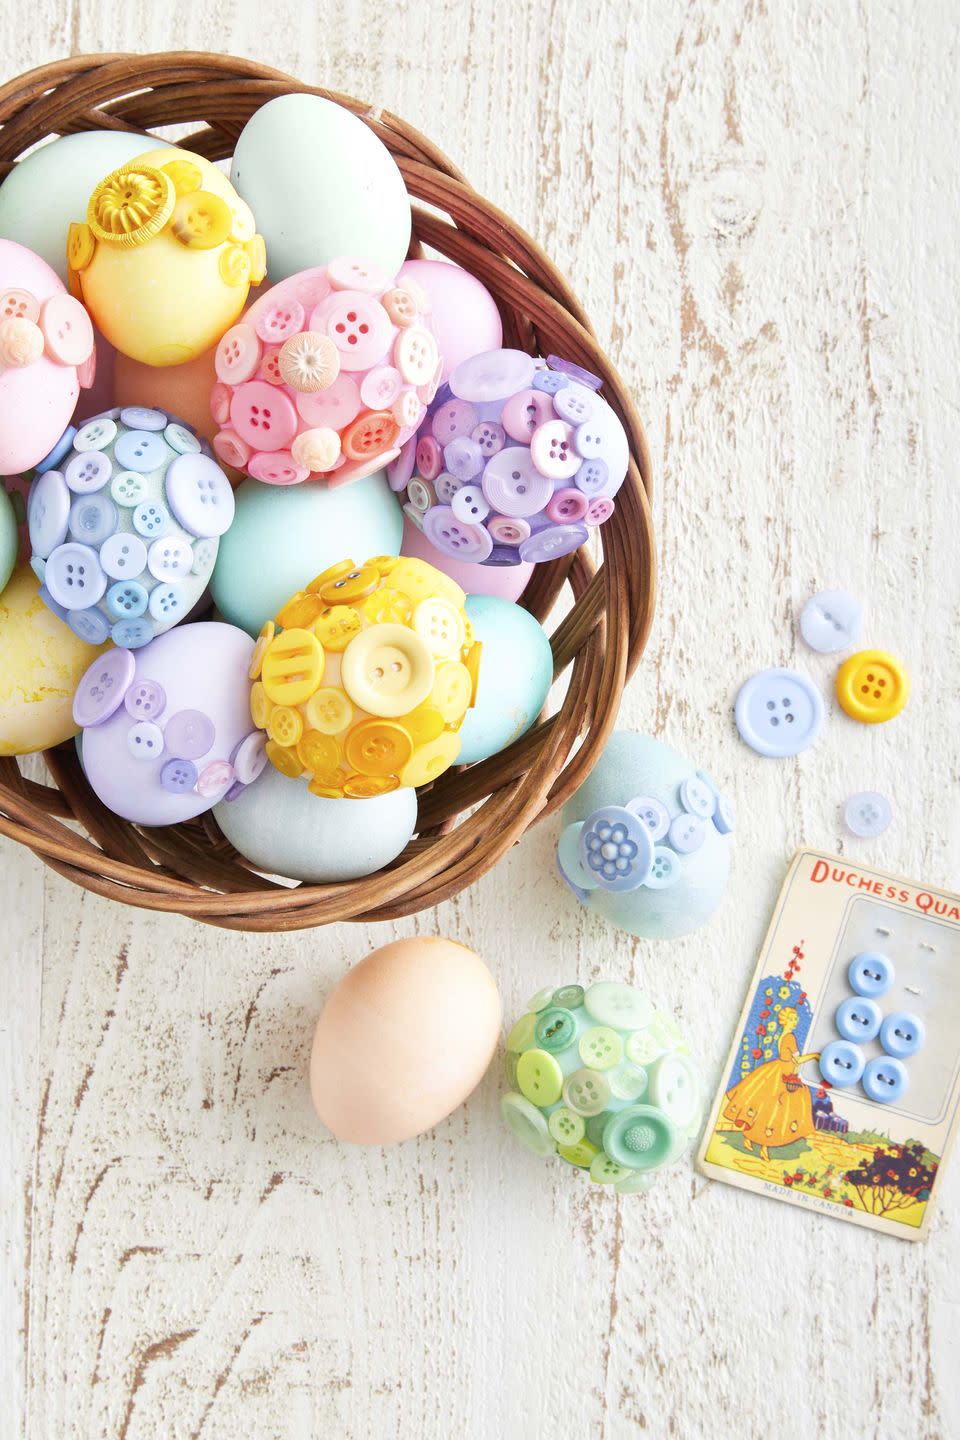
Button Eggs
Head the the sewing basket and grab the spare buttons to create these jewel-like beauties.
To make: Start by dying eggs the same colors as the buttons. Once dry, hot-glue buttons to the eggs, either covering completely or in a center band.
Bunny Napkins
Cute as a pink button nose, these bunny napkins can be assembled in 10 minutes flat and will add so much charm to your Easter table.
To make: Paint small wooden craft beads pink, allow to dry completely. Fold a napkin in half, corner to corner, then roll up, starting from the point. Fold the rolled napkin into a U-shape. Loop a length of raffia around the napkin and through the craft bead. Fray raffia to create whiskers.

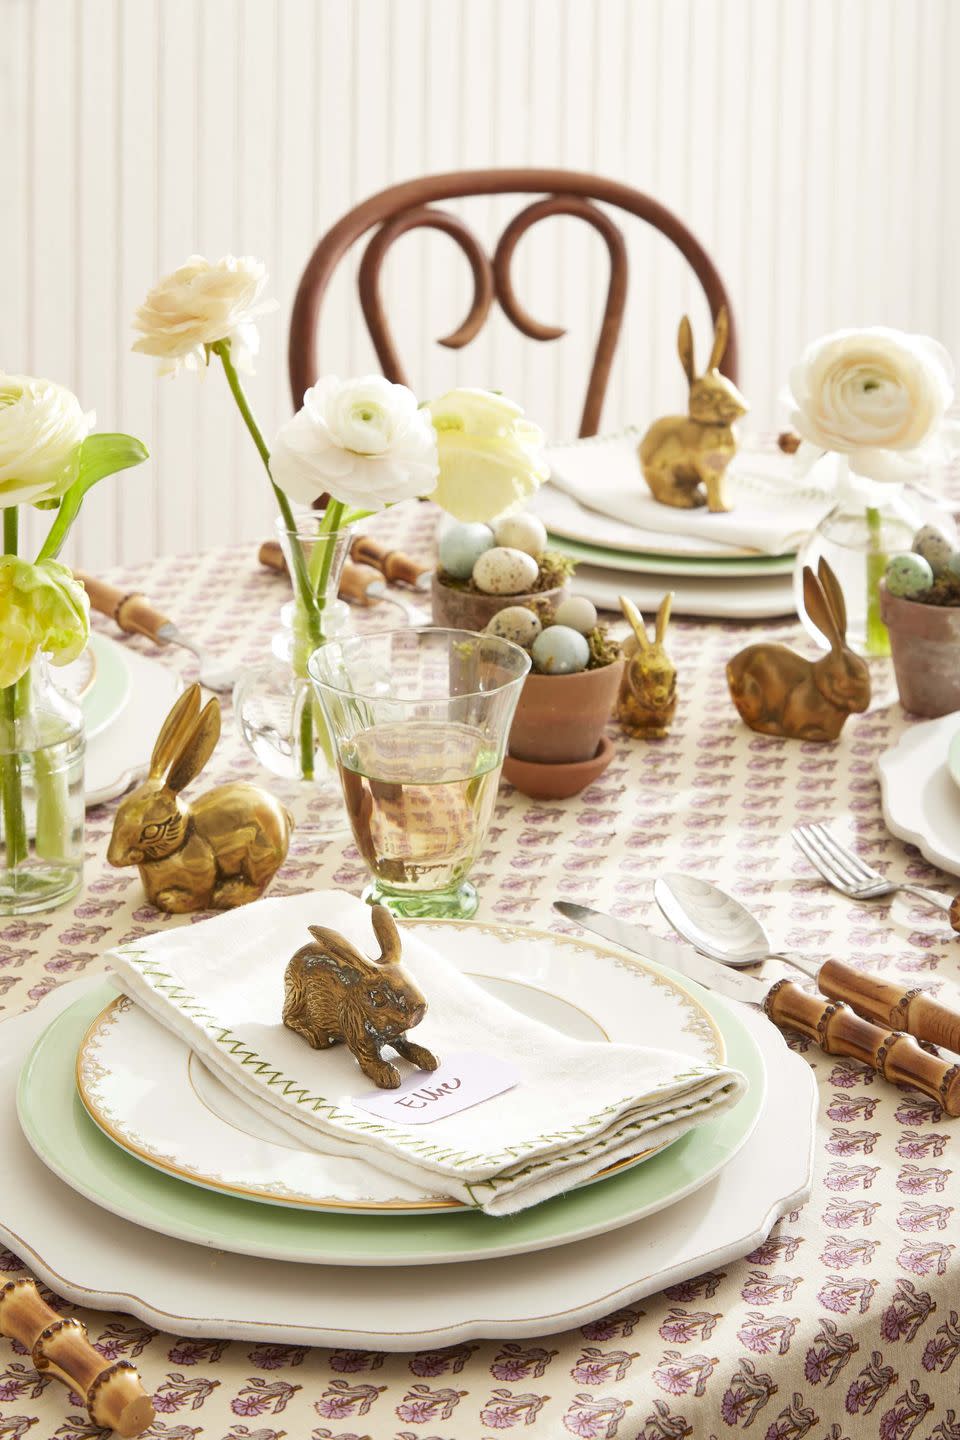
Brass Bunny Tablescape
Create a welcoming fluffle (that’s the name of a group of rabbits!) by anchoring placecards under the paws of small brass bunnies. For added appeal, create a “rabbit runner” down the length of the table.
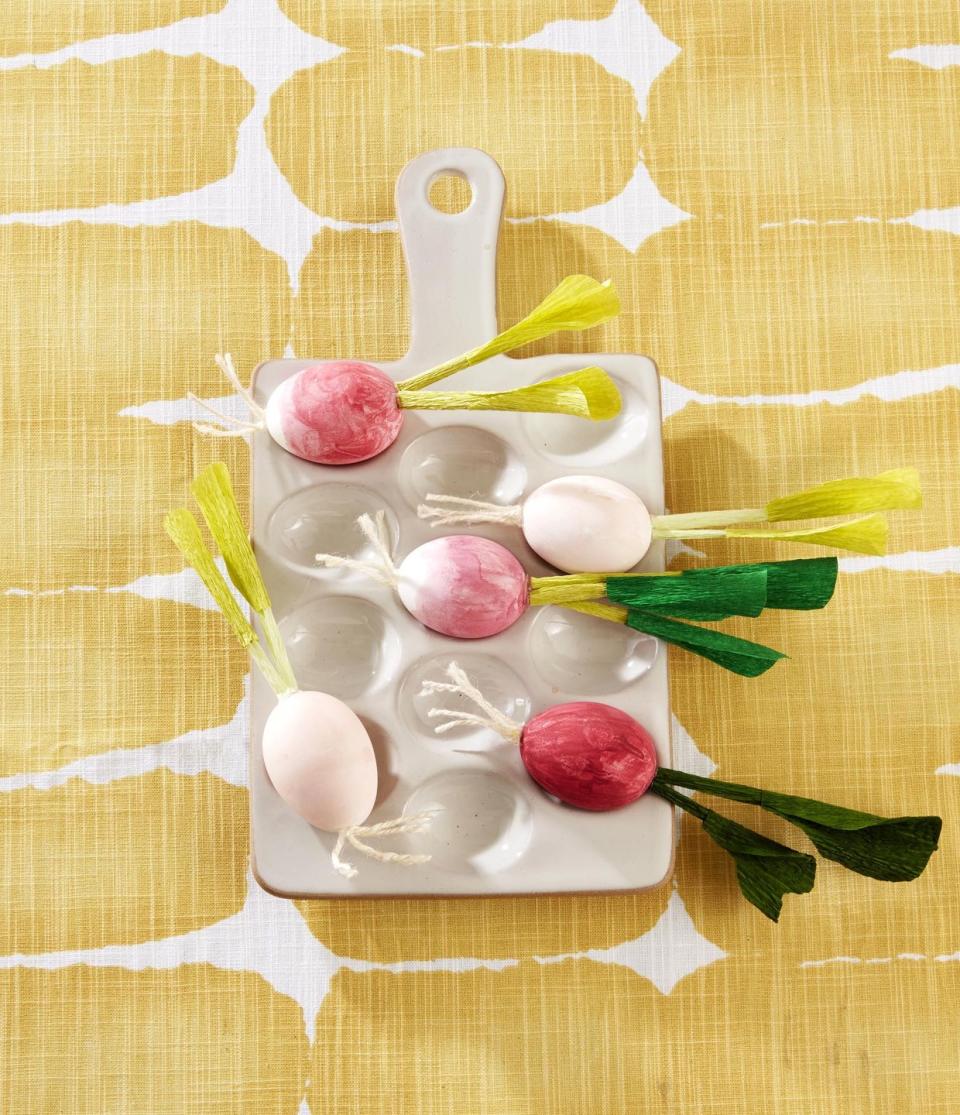
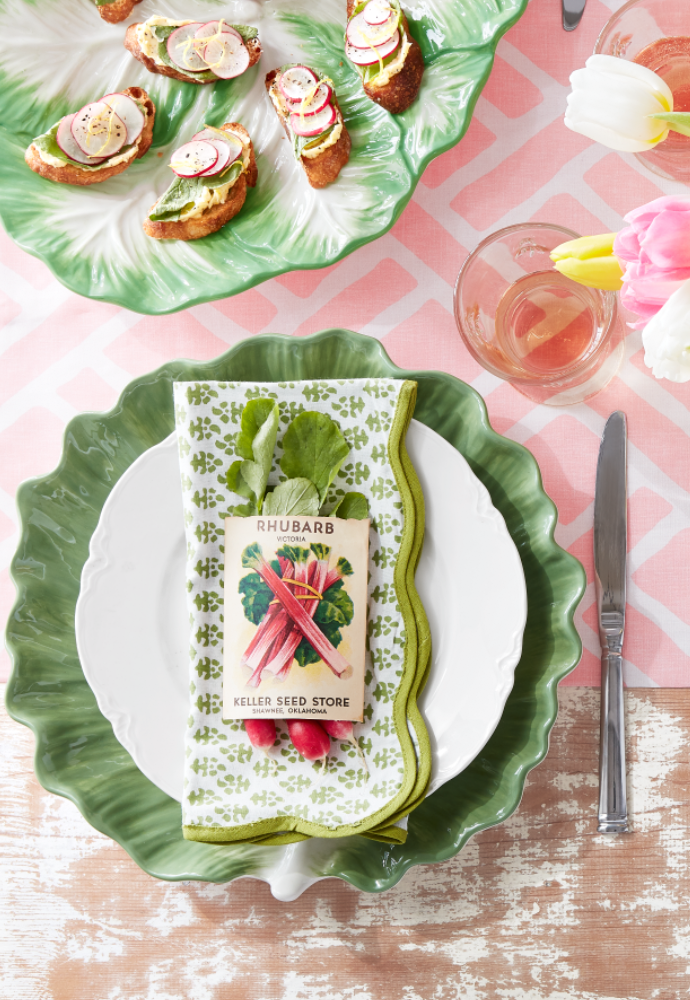
Radish Eggs
Good enough to eat, these radish eggs can either be painted or dyed.
To make: Paint or dye three-quarters of a blown-out white egg pink. Create roots by attaching pieces of off-white twine to the bottom with hot-glue. Roll up light green crepe paper to create a stem; seal seam with glue. Cut leaves from crepe paper; wrap around stem, and attach with glue. Glue stem to top of egg.
Pom Pom Bunny Wreath
Soft and plush, this wreath can be made with homemade or store-bought pom-poms.
To make: Make or buy 17 large white pom-poms. Attach to a 12-inch craft ring with hot-glue. Cut ears from white and pink felt; use glue to attach together and then to the back of the craft ring.

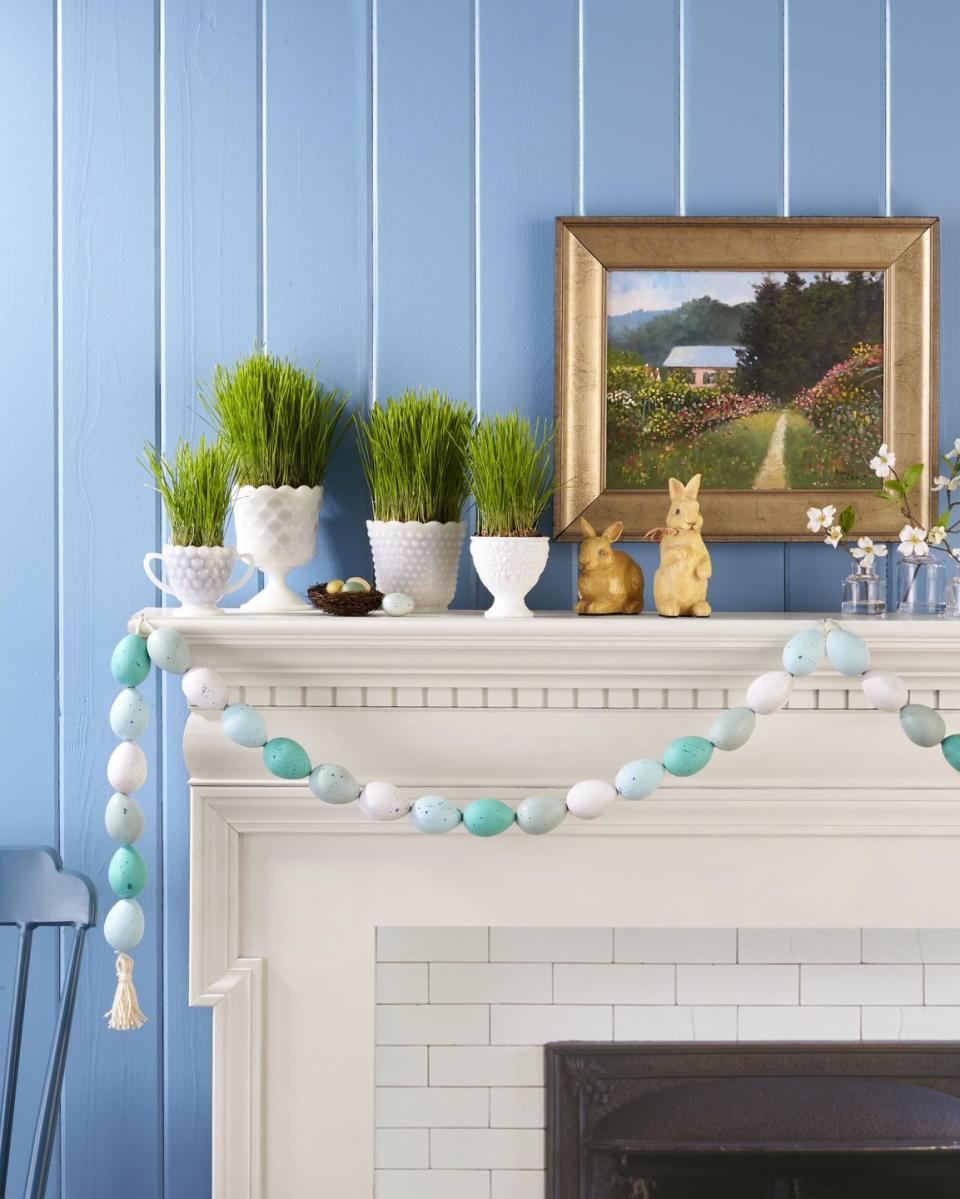
Speckled Egg Garland
Display this simple to make garland year after year.
To make: Use an awl to poke holes in ends of papier-mâché eggs, then paint eggs white, robin’s-egg blue, and turquoise with acrylic paint. Once dry, spatter with dark blue paint. Thread twine through holes, and hang, adding a tassel detail, if desired.

Parsnip & Carrot Napkin Rings
Made from mini wooden craft beads, these napkin rings mimic bunnies favorite foods, root veggies!
To make: Dye wooden craft beads orange or white. Arrange eight beads small to large in a row, and thread a piece of twine in a corresponding color through beads; knot on both ends. Wrap a wooden craft ring with twine, and tie between the beads for the napkin holder. For the stems, attach lengths of preserved grass or green crepe paper to the top with hot-glue.

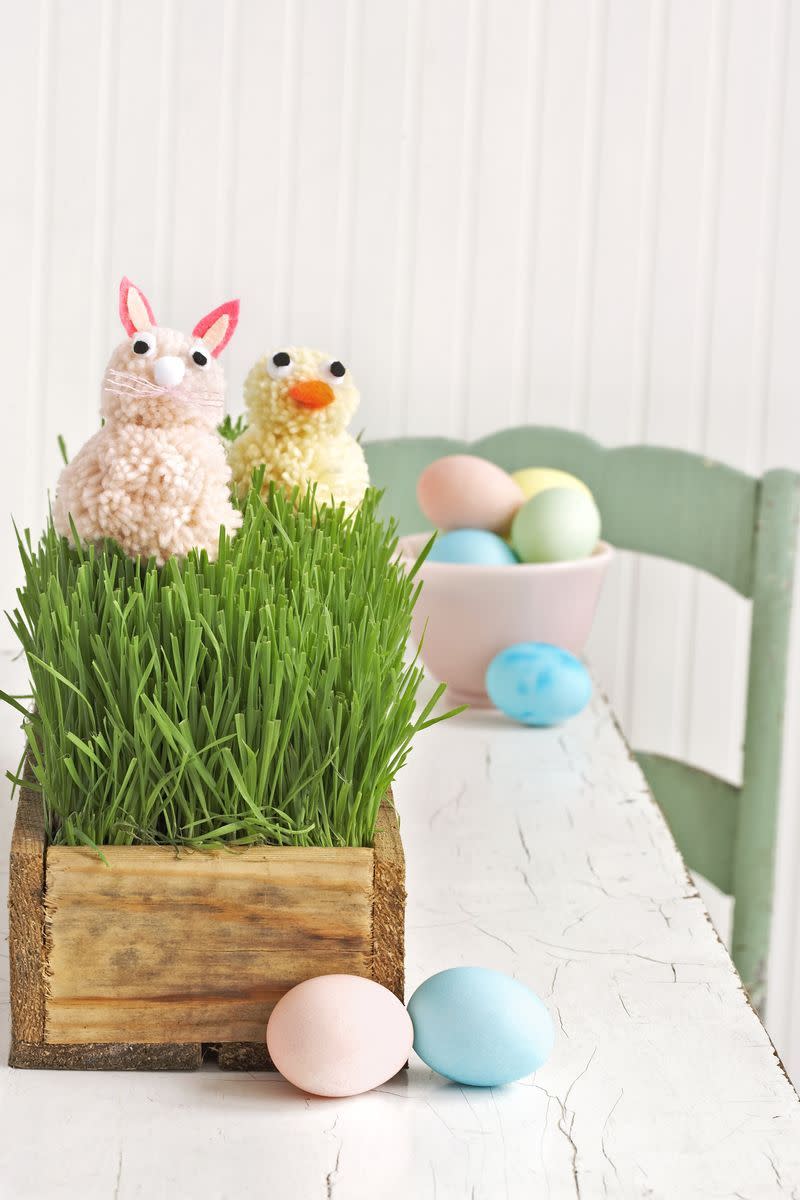
Easter Grass Display
Make this display in less than 5-minutes flat!
To make: Simply plant wheatgrass (available at garden stores or flower shops) in milk glass vessels such as the sugar dish, goblet, and vase shown here. Water as necessary to keep fresh. Sugar dishes also make for sweet placecard holders; simply tie a card to each handle.
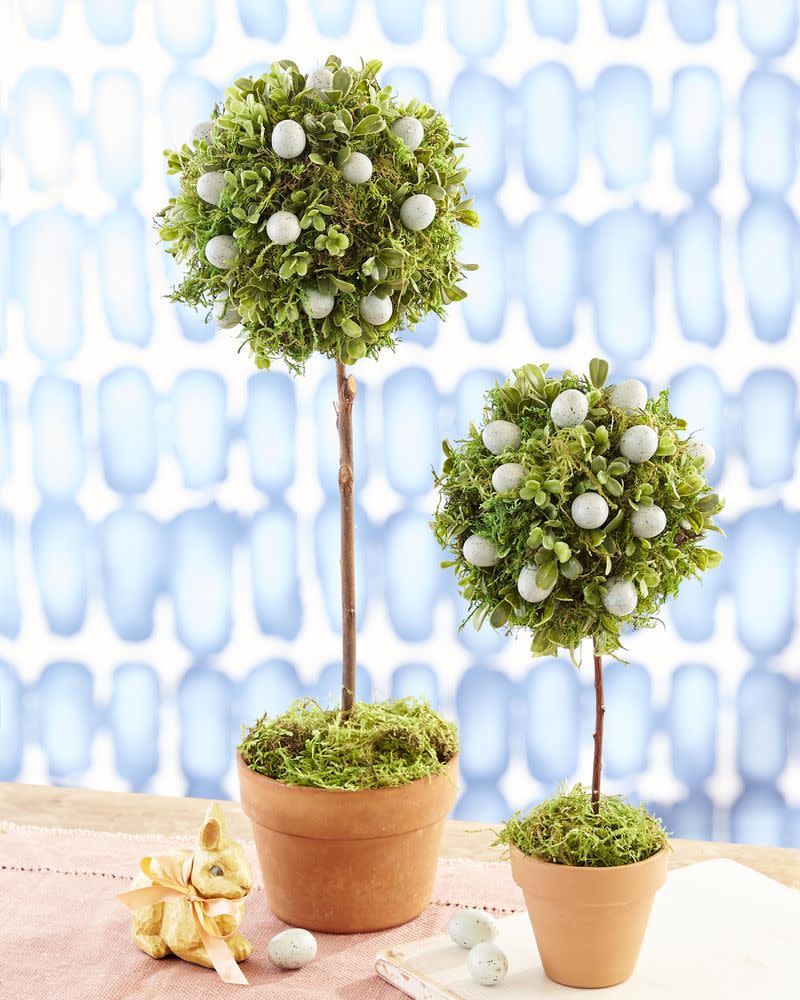
Mini Egg Topiaries
Made from moss and faux boxwood, these topiaries make the perfect focal point for your Easter table.
To make: Using hot-glue, attach preserved green sheet moss and fake mini boxwood greenery to a round Styrofoam ball until covered. Nestle faux robin’s eggs in moss, attaching with glue. Fill a clay pot with floral foam. Poke a stick into bottom of topiary, and insert into floral foam; cover foam with moss.
Fabric Tulips
Use springy fabric scraps to make this bouquet that will never wilt.
To make: Download the flower template and trace on fabric. Cut out and sew together with right sides facing inward, leaving bottom open. Turn right side out; fill with batting. Glue strips of green felt around wires to create stems. Insert into bottoms of tulips, pushing nubs into flowers, and hot-glue in place. Attach green felt leaves with glue.

Egg Carton Wreath
Made from the common paper egg carton this wreath will look spectacular displayed on a covered door or over the mantel.
To make: Cut individual egg cups from paper egg cartons. Notch and cut decorative edges with scissors. Dye or paint cups desired colors. Attach cups and craft paper leaves to a painted craft ring with hot-glue.

Vintage Egg Basket Vase
A vintage French egg collecting basket filled with colorful wooden eggs makes the perfect home for displaying your abundant spring bouquet (here are lilacs, anemones, Scabiosa lavender, allium, and ranunculus).
To make: Dye or paint wooden eggs white or robin's egg blue. You can also leave a few natural. Place a vase inside the basket and surround with eggs. Fill vase with water and flowers.

Dip-Dyed Baskets
A simple dyed cotton basket will add pops of color for storing candy or utensil on the Easter table.
To make: Dip the top quarter of a cotton basket in desired color of fabric dye. When dry, fill with moss and Easter eggs or candy.

Coffee Filter Flowers
Make these flowering candy dishes with an item you probably already have in your house: coffee filters.
To make: Submerge regular-size white coffee filters (you’ll need four to six for each flower) in a watered-down Rit Dye solution (here, Petal Pink); dry completely. Cut into flower shapes of various sizes, and stack largest to smallest. Attach at centers with craft glue. Glue a papier-mâché or store-bought candy cup to center of each. Fill with candy.

“Egg” Vases
These papier-mâché vases are ideal for serving candy or holding a beautiful bouquet.
To make: Blow up a large and a medium balloon. Cover each with white papier-mâché craft paper, leaving bottom quarter to third uncovered and edges rough. Let dry. Pop balloons, and remove. Set a vase inside each, and fill with water and flowers.

DIY Floral Favor Boxes
We love the look of these sweet floral boxes, which can be given as favors at the end of your Easter meal or used to welcome guests as it begins. Fill them with whatever homemade treat your heart desires!
Make the Boxes: Top a small box with dogwood flowers cut from watercolor paper and decorated with watercolor pens. Hot-glue tiny pieces of green pipe cleaner to the centers, then cut leaves from green paper and hot-glue them to the bottoms of the flowers. Fill the boxes with macarons, wrap them with twine, and tape the flowers on top.

Cross-stitch Easter Egg
It's easy to make a "cross-stitch" egg, and no, you don't have to be an artist to make it happen: Draw small x’s (to mimic cross-stitches) with a paint pen in the shape of an initial on natural or dyed eggs.

Cute Critters Centerpiece
Step 1: To create this spring chicken—and bunny—hot glue two pom-poms together, using the smaller tool to make the head and the larger for the body.
Step 2: From craft felt, cut out small black and white circles for the eyes and pink petal shapes in two sizes for the bunny's ears. Use premade mini pom-poms for the nose and beak (just trim the orange pom-pom into an oval shape).
Step 3: Separate a one-inch length of embroidery floss into strands, and knot it in the middle for bunny whiskers.
Step 4: Adhere everything with little dabs of hot glue (place the smaller items with twee- zers), then nestle the completed figures in a box filled with wheatgrass—found at most farmers' markets and florists.
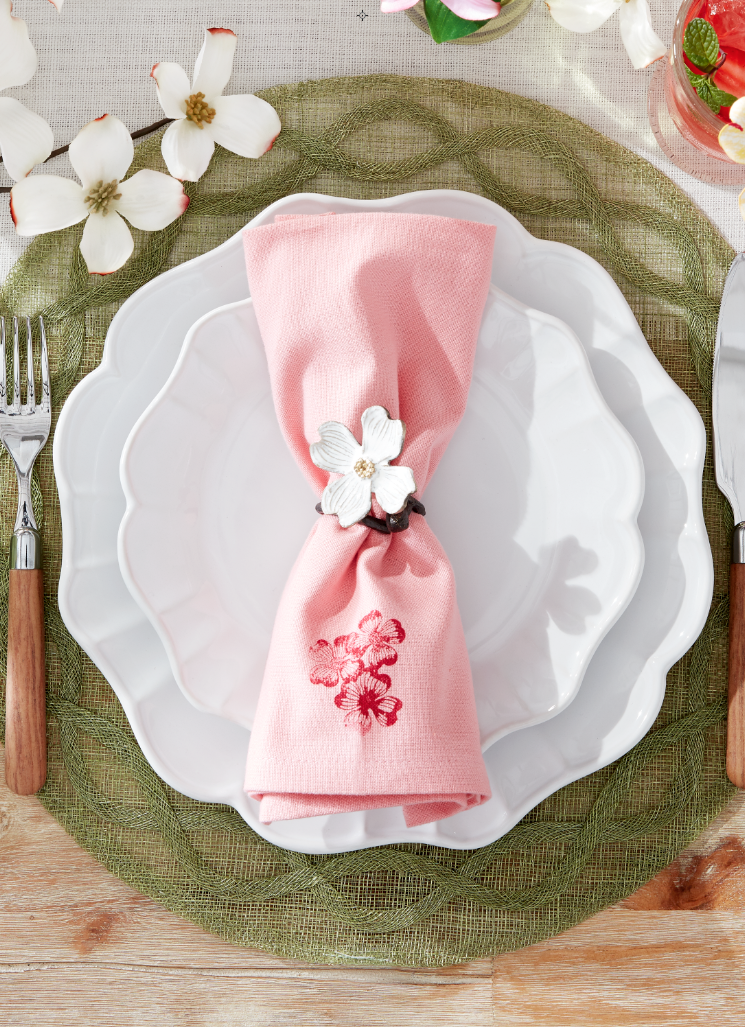
DIY Floral Stamp Napkins
Here's a sweet idea for this year's Easter brunch: Make your own custom napkins by rolling a floral stamp with a thin layer of fabric paint (here, red) and applying it to light pink linens.
DIY Vintage Linen Tablecloth
Keep your Easter brunch casual with this DIY layered tablecloth, which incorporates vintage linens. Use pinking shears to create an uneven edge, or simply tear the fabric to create frays.
DIY Stem Straws
It's easy enough to make these DIY straw decorations. Just cut dogwood-shaped flowers from watercolor paper and decorate the edges with watercolor pens. Then, punch a hole in the center of the flower, and slip the straw through the hole.
Seed Packet Place Setting
Now, this is a springy setting! For a seasonal feel, thread baby radishes through seed packets.
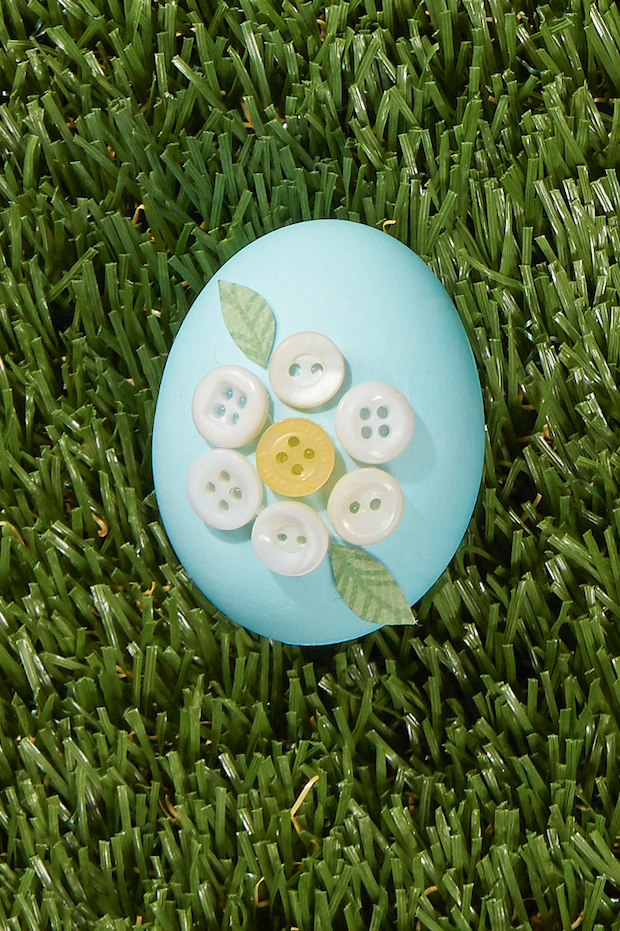
Button Flower Easter Egg
Hot-glue small white and yellow buttons, arranged in a flower shape, to a natural or dyed egg to achieve this pretty look. Attach paper leaves with hot glue to finish it off.
Chick Bookmark
Here's a craft you can use well after Easter ends: a bookmark! It's adorable and perfectly on-theme.
Get the tutorial at Hey Let's Make Stuff.

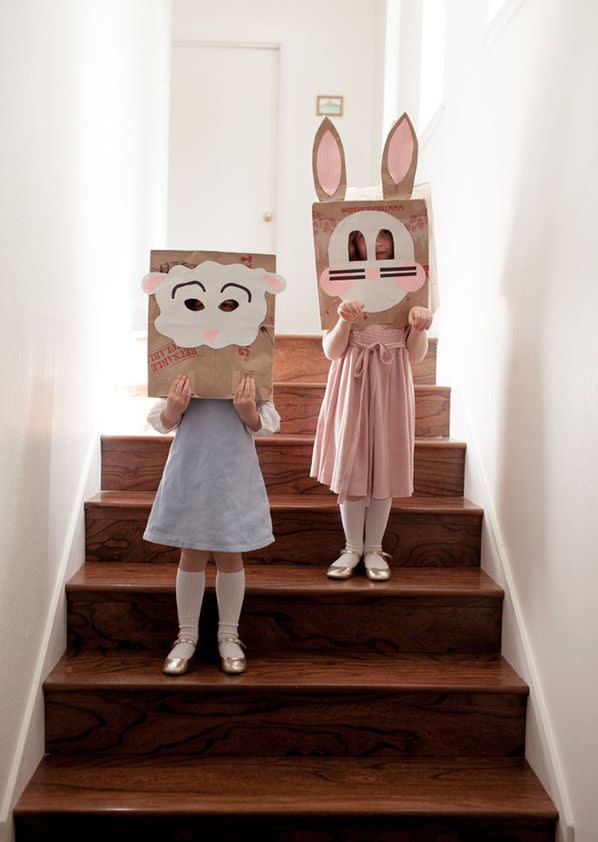
Brown Sack Easter Masks
Instantly transform your little ones into (the cutest!) lambs, chicks, and bunnies with these easy-to-make masks.
Get the tutorial at Oh Happy Day.
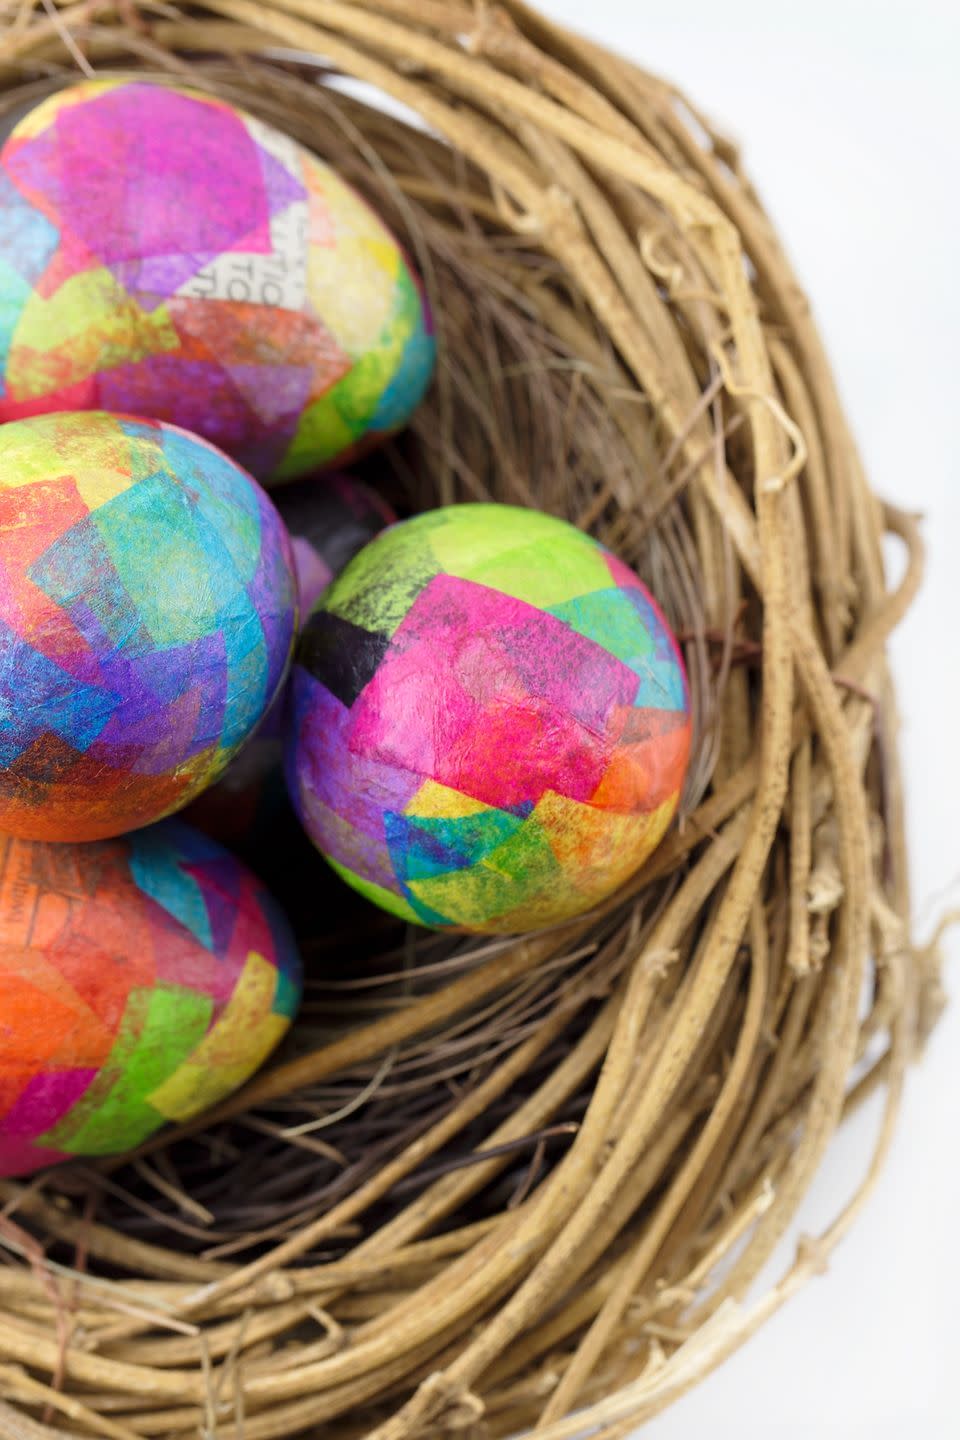
Tissue Paper Eggs
If traditional egg dyeing feels too been there, done that, use the papier-mâché technique to craft equally one-of-a-kind creations.
Get the tutorial at Fireflies and Mud Pies.
Egg Carton Spring Chicks
Our favorite projects are the ones that involve recycling. This sweet chick DIY, which features leftover egg carton pieces, fits the bill!
Get the tutorial at Typically Simple.

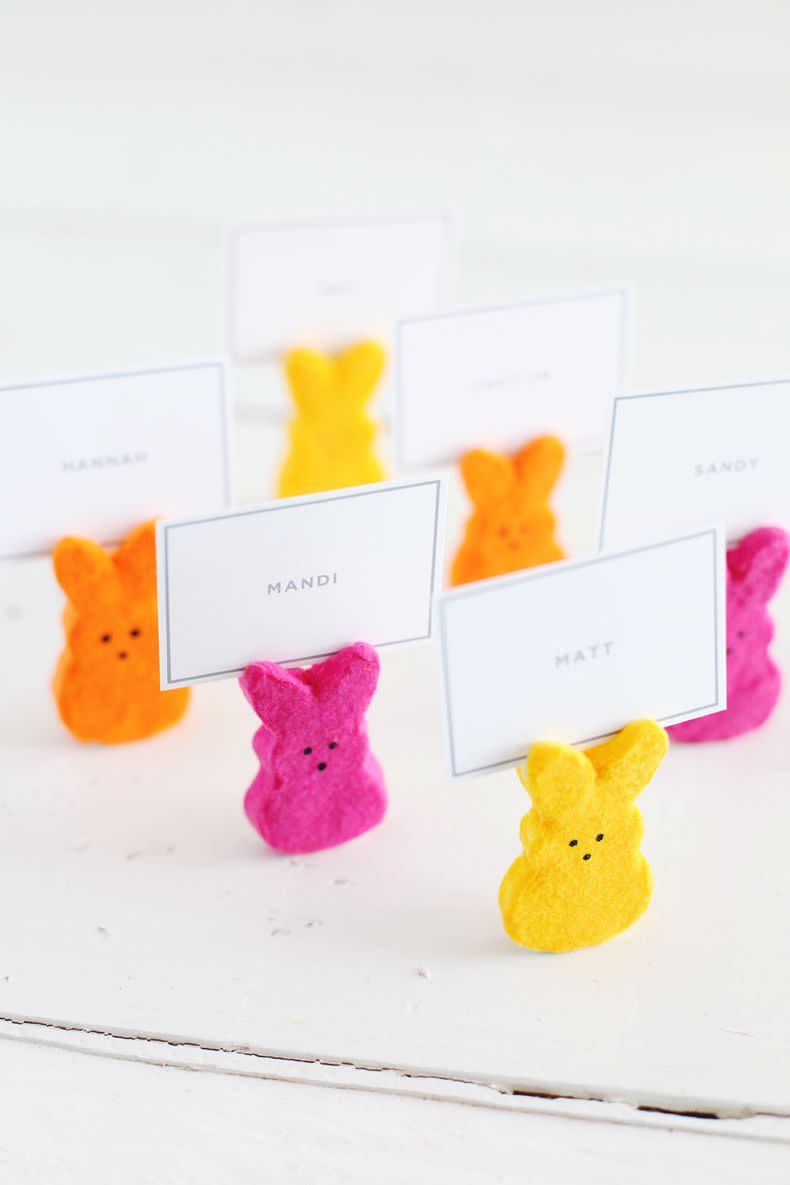
Peep Place Cards
No, these aren't real Peeps! They're actually made of clay—so you can reuse them over and over again.
Get the tutorial at A Beautiful Mess.
Embroidery Hoop Bunny
Make some Easter wall decor with two embroidery hoops and colorful fabric. Don't forgot a cotton ball for a fluffy tail.
Get the tutorial at Design Improvised.

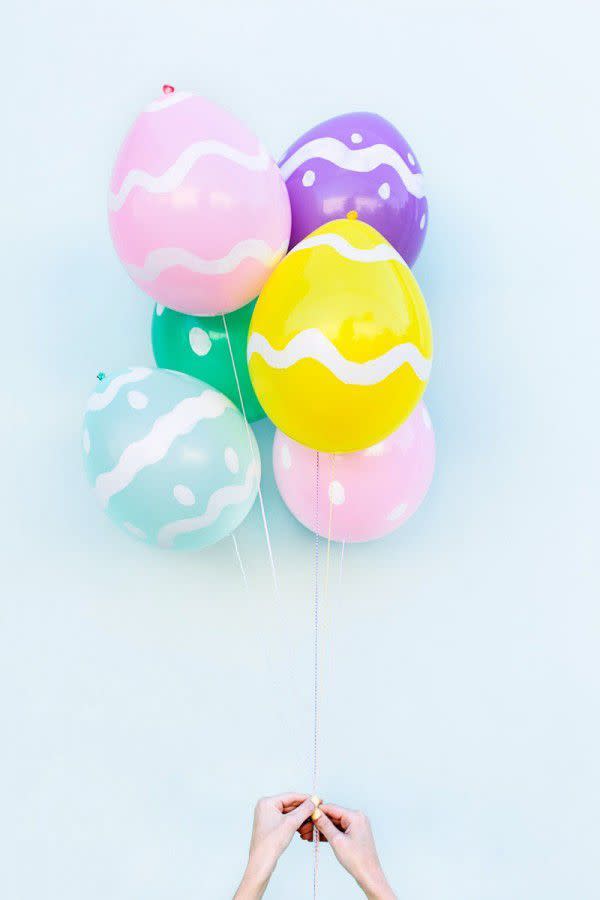
Easter Egg Balloons
Bet you'll never look at balloons the same way after making this simple DIY! Craft paint will help you craft a stunning "Easter egg" bouquet.
Get the tutorial at Studio DIY.
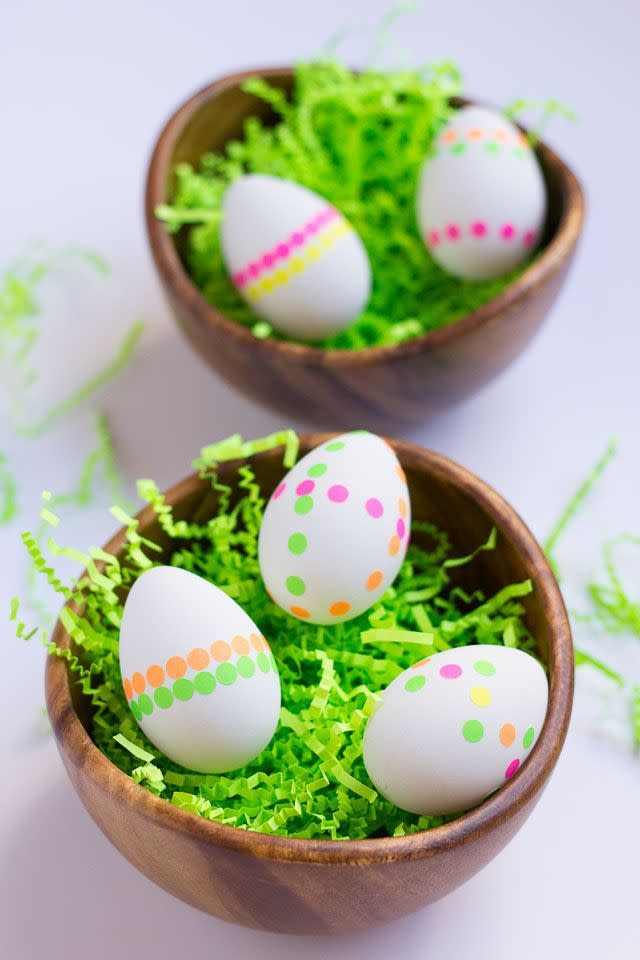
DIY Neon Polka Dot Sticker Easter Eggs
Got a dozen eggs and a few neon dot stickers? You're in business!
Get the tutorial at Design Improvised.
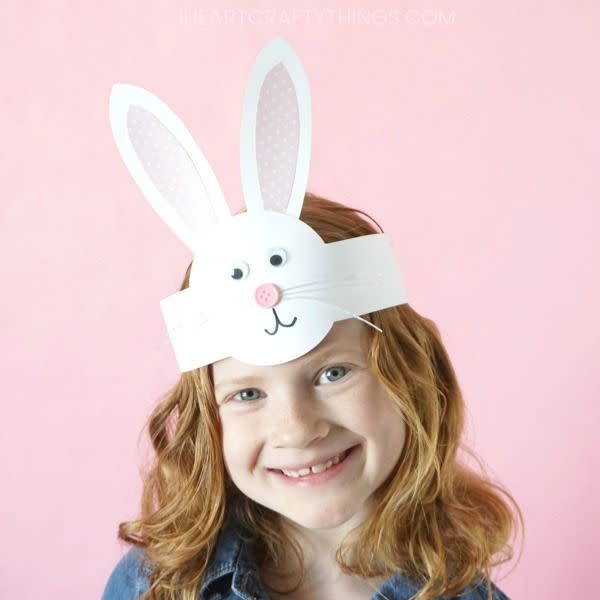
DIY Easter Bunny Headband
A full-on festive headband takes bunny ears to the next level.
Get the tutorial at I Heart Crafty Things.
Potato Easter Egg Stamps
Use a carving knife to create egg-shaped stamp designs on potato halves, then let your creative kiddos take the reigns.
Get the tutorial at The Best Ideas for Kids.

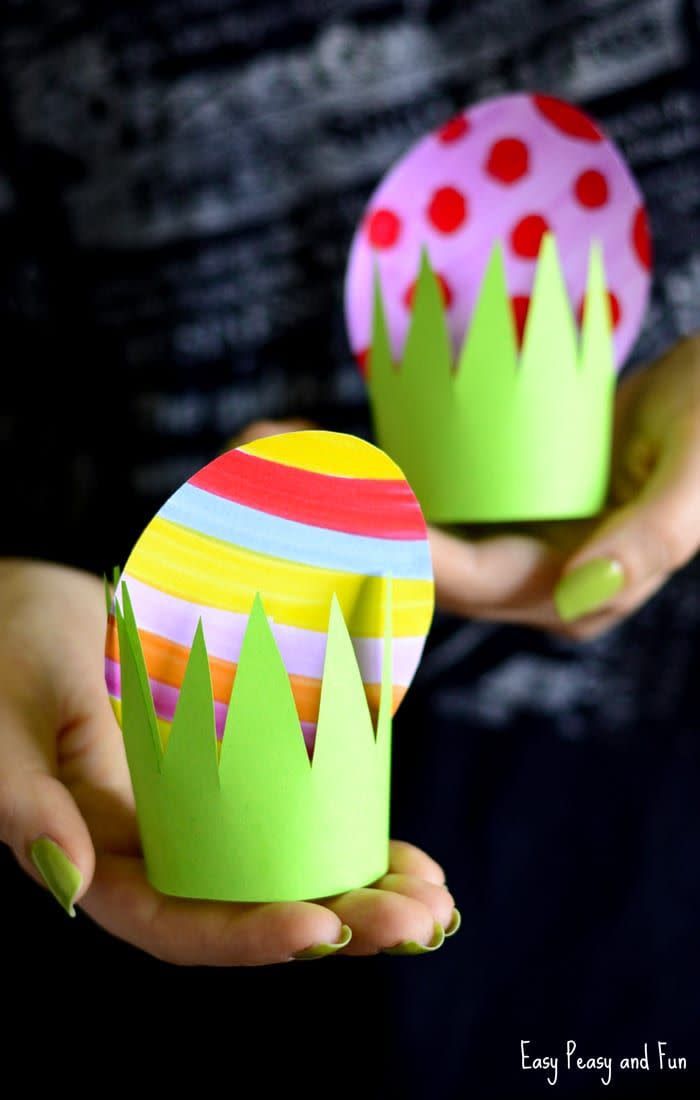
Paper Egg and Grass Craft
No need to splurge on Easter decor—display your children's cute paper creations around the house, instead. Plus, they can whip this craft up with supplies already lying around the house.
Get the tutorial at Easy Peasy Fun.
Easter Bunny Party Hats
Few Easter crafts can surpass these hats on the cuteness scale. Your mini partygoers will love making and wearing them.
Get the tutorial at The House That Lars Built.

Felt Easter Eggs
The more creativity, the merrier when it comes to DIY felt Easter eggs. Bonus: there's way less mess involved than egg dyeing.
Get the tutorial at The Best Ideas for Kids.

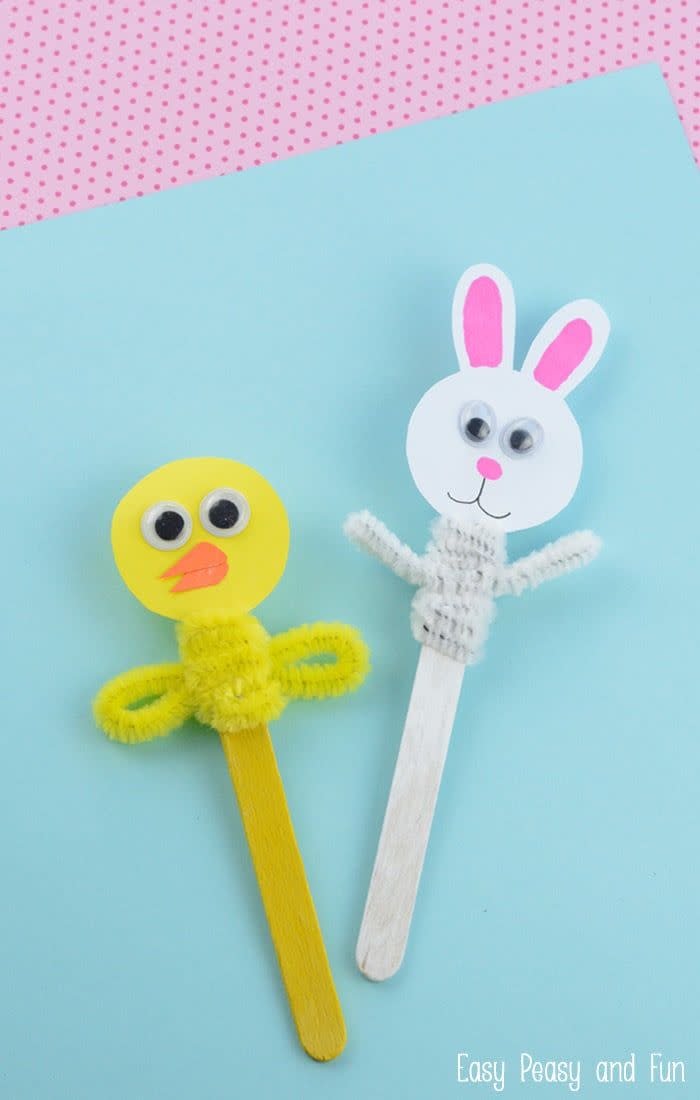
Easter Stick Puppets
DIY bunny and chick Easter puppets will keep your tots entertained from craft time to play time.
Get the tutorial at Easy Peasy and Fun.
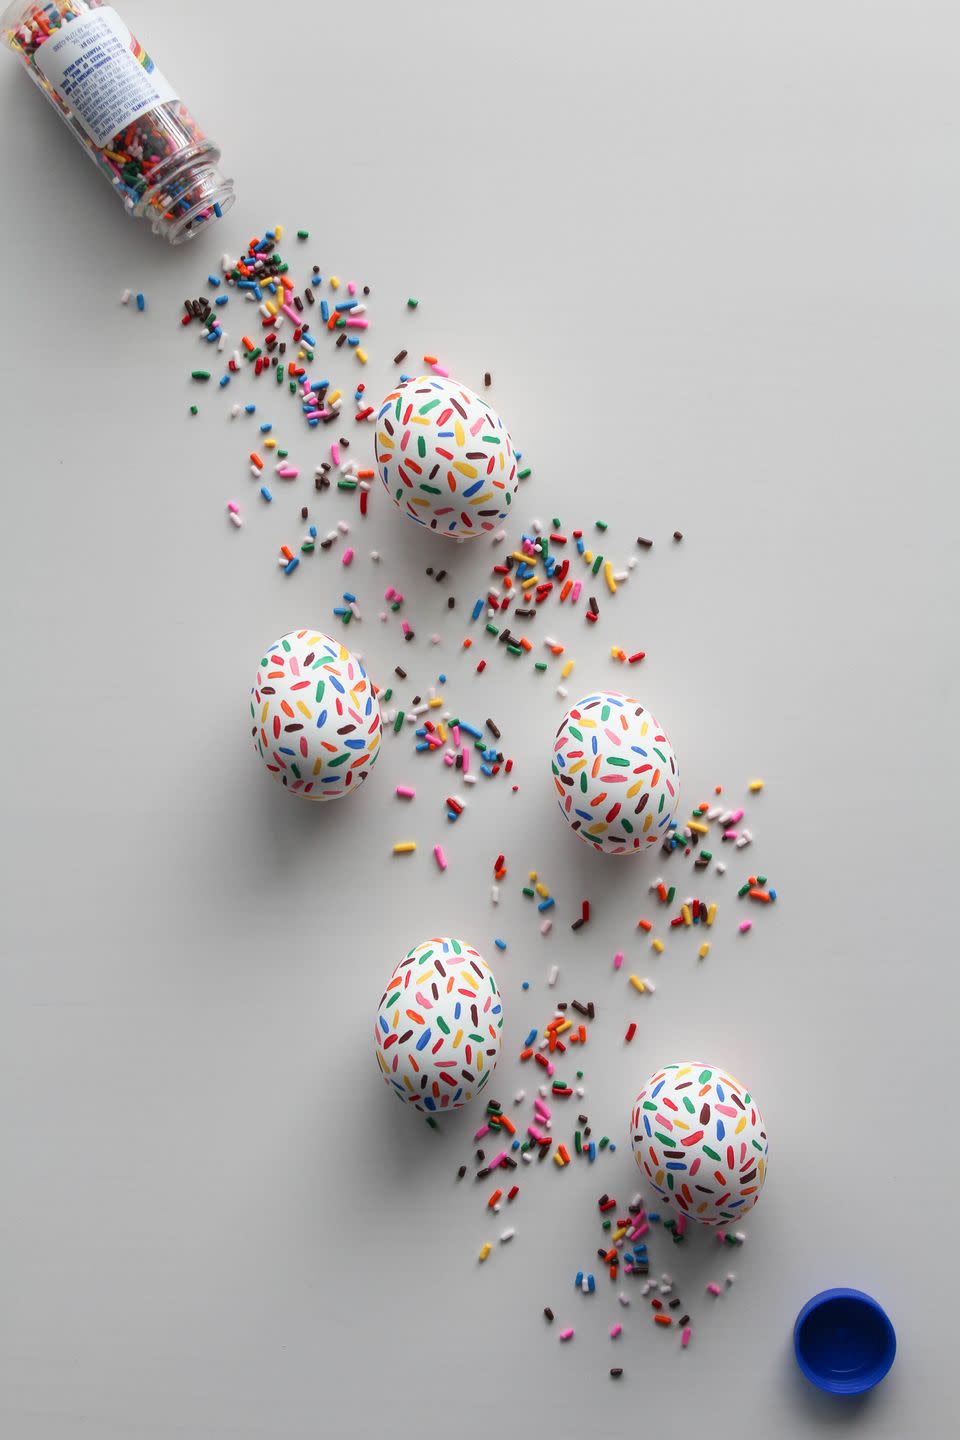
DIY Sprinkle Easter Eggs
Baking family Easter cookies may not be on the agenda this year, but you can keep the sweet vibe alive thanks to sprinkle-inspired eggs. If your kids can paint in a straight line, then they can master this project in no time.
Get the tutorial at Let's Mingle.
DIY Easter Egg Flower Pot
This easy kids craft comes together using plastic Easter eggs and hot glue—and you get to try out your green thumbs together, too!
Get the tutorial at Made With Happy.

DIY Salt Dough Easter Eggs
Kiddos can craft these little works of art to hang from a DIY Easter tree fashioned from backyard branches.
Get the tutorial at Design Mom.

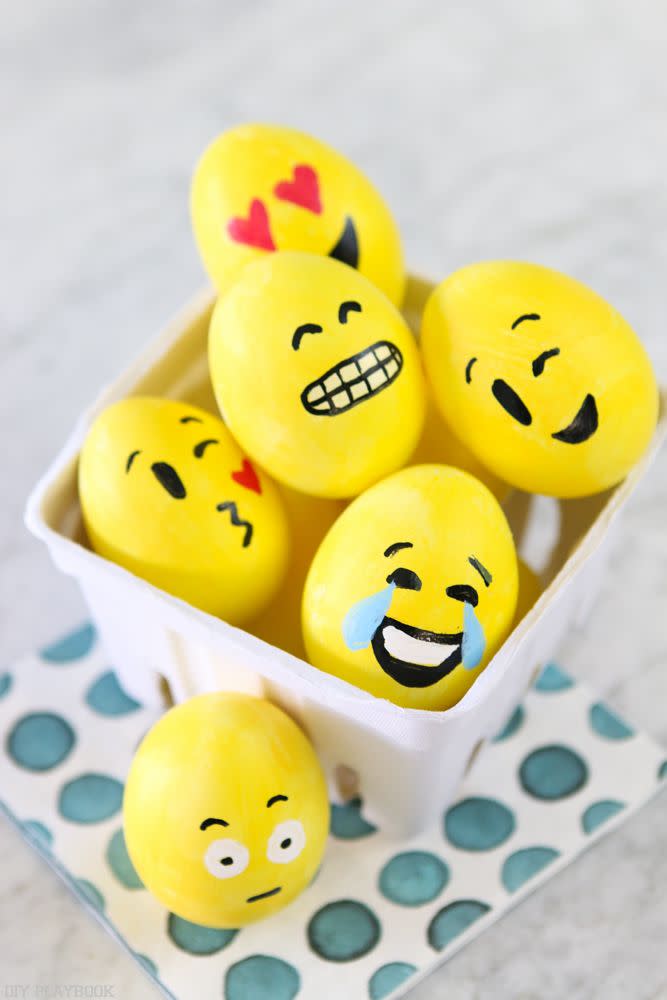
Emoji Easter Eggs
These silly Easter eggs require minimal art skills—even the youngest members of your family can make 'em!
Get the tutorial at The DIY Playbook.
RELATED: Fun Easter Egg Decorating Ideas
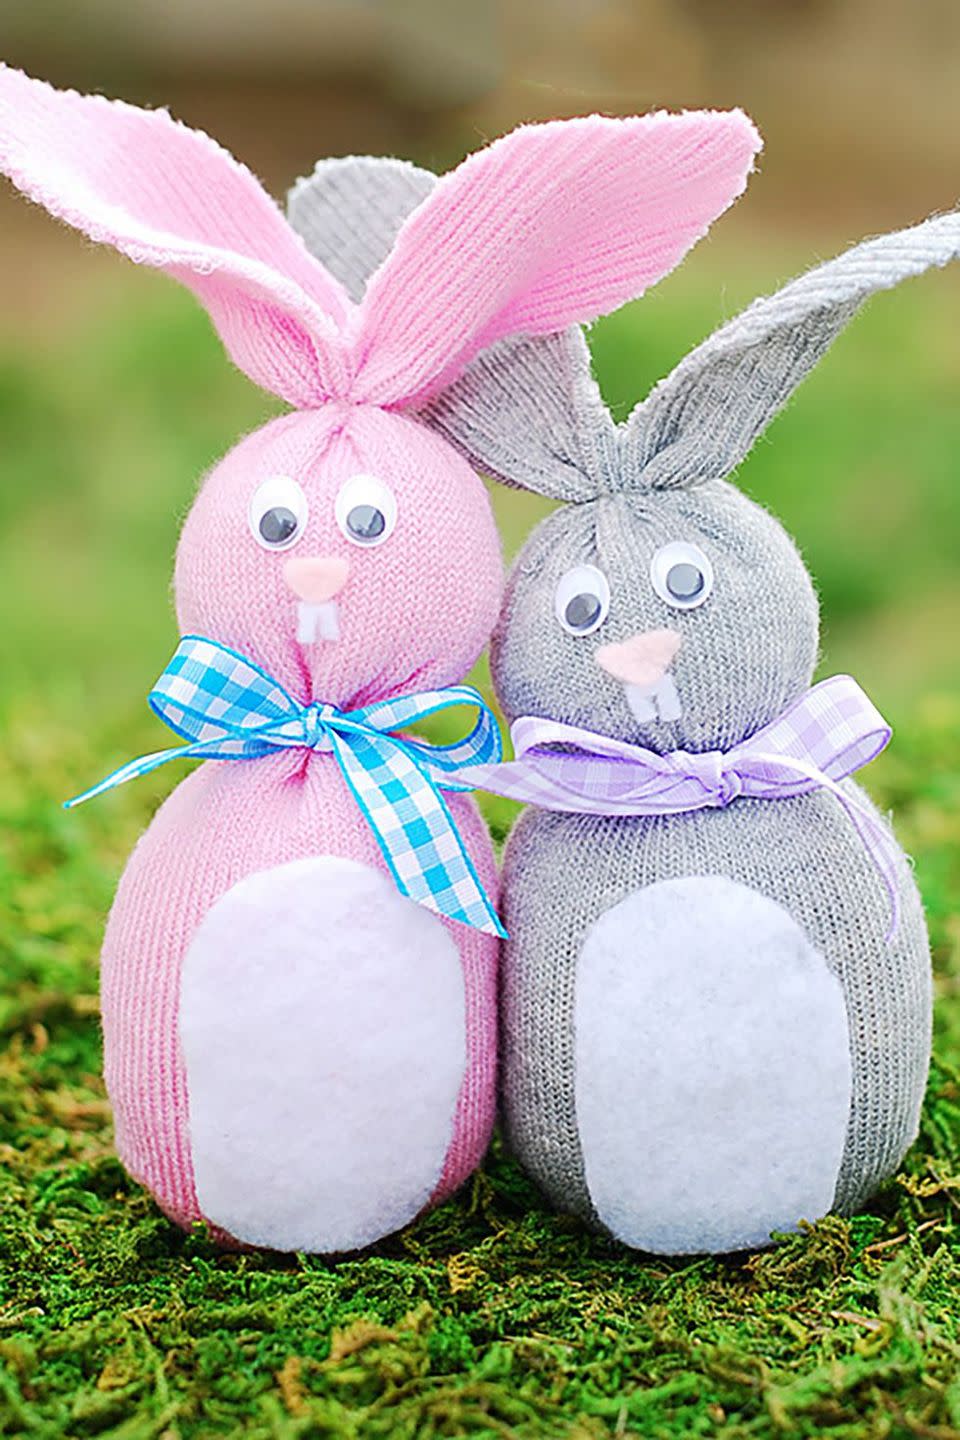
Sock Bunny
A small sock, glue-on googly eyes, some ribbon, and felt become an adorable woodland creature in this kid-friendly craft.
Get the tutorial at A Pumpkin & A Princess.
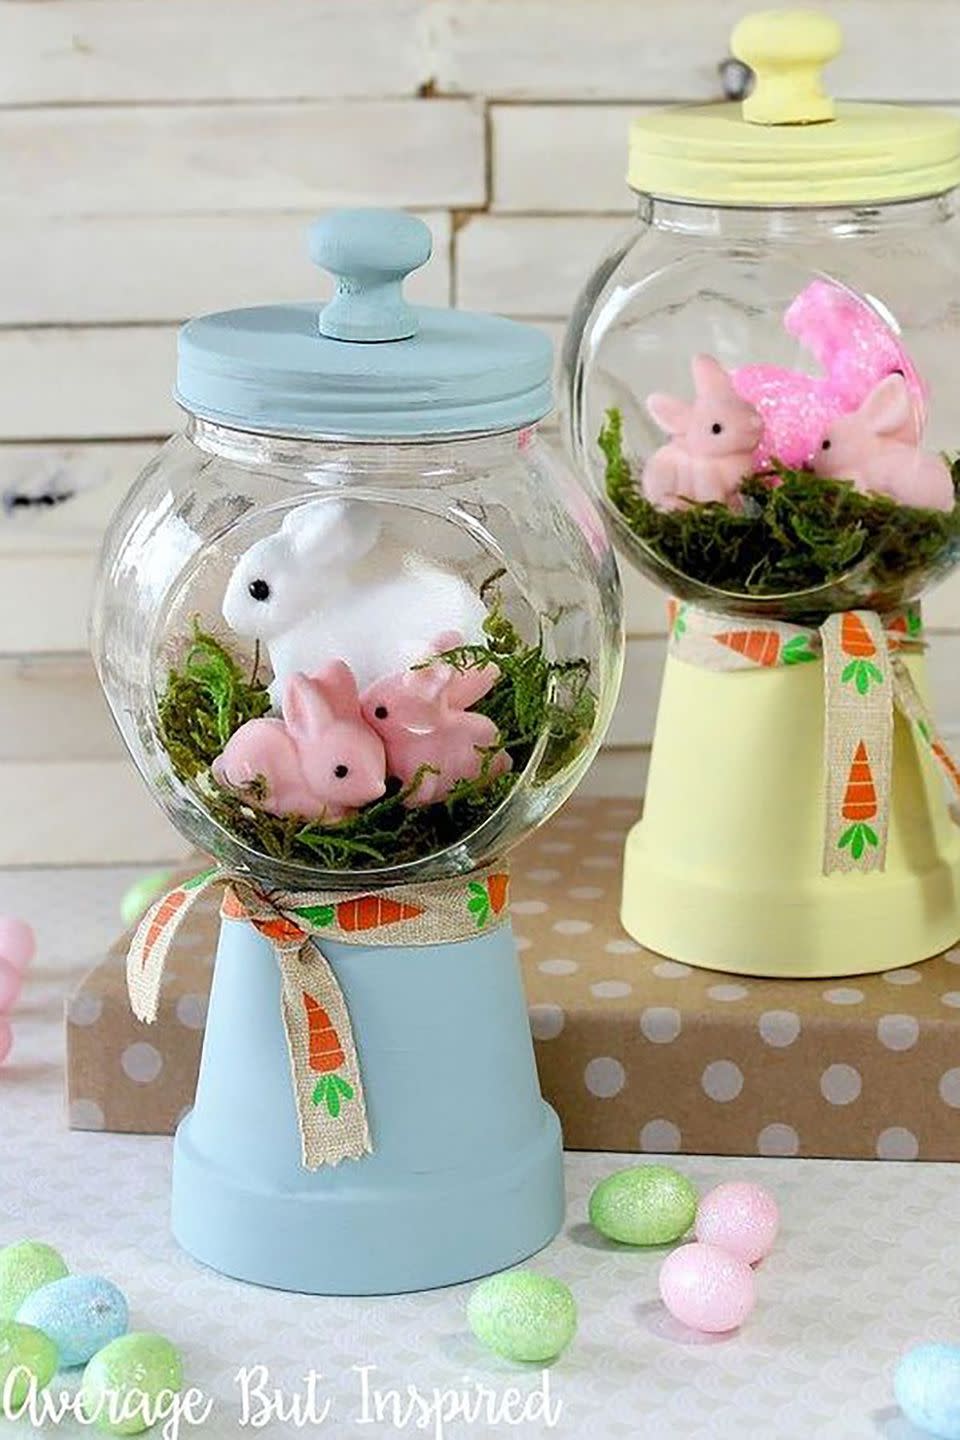
Spring Scene Gumball Machines
These faux gumball machines are made of overturned terra cotta pots and empty candy jars. Nestle a clump of artificial grass and a few plastic bunnies inside for a cute Easter vignette.
Get the tutorial at Average But Inspired.
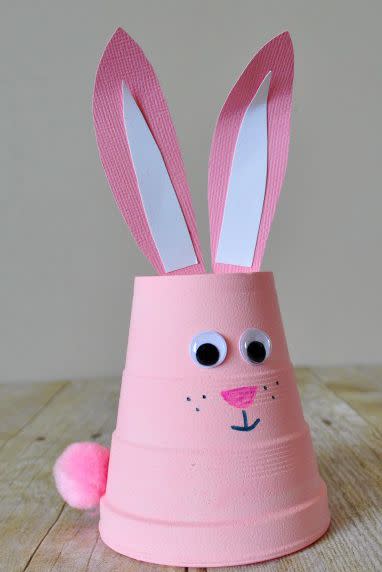
Foam Cup Bunny
These little pink bunnies are so easy to make and will look adorable around the house for Easter.
Get the tutorial at I Heart Crafty Things.
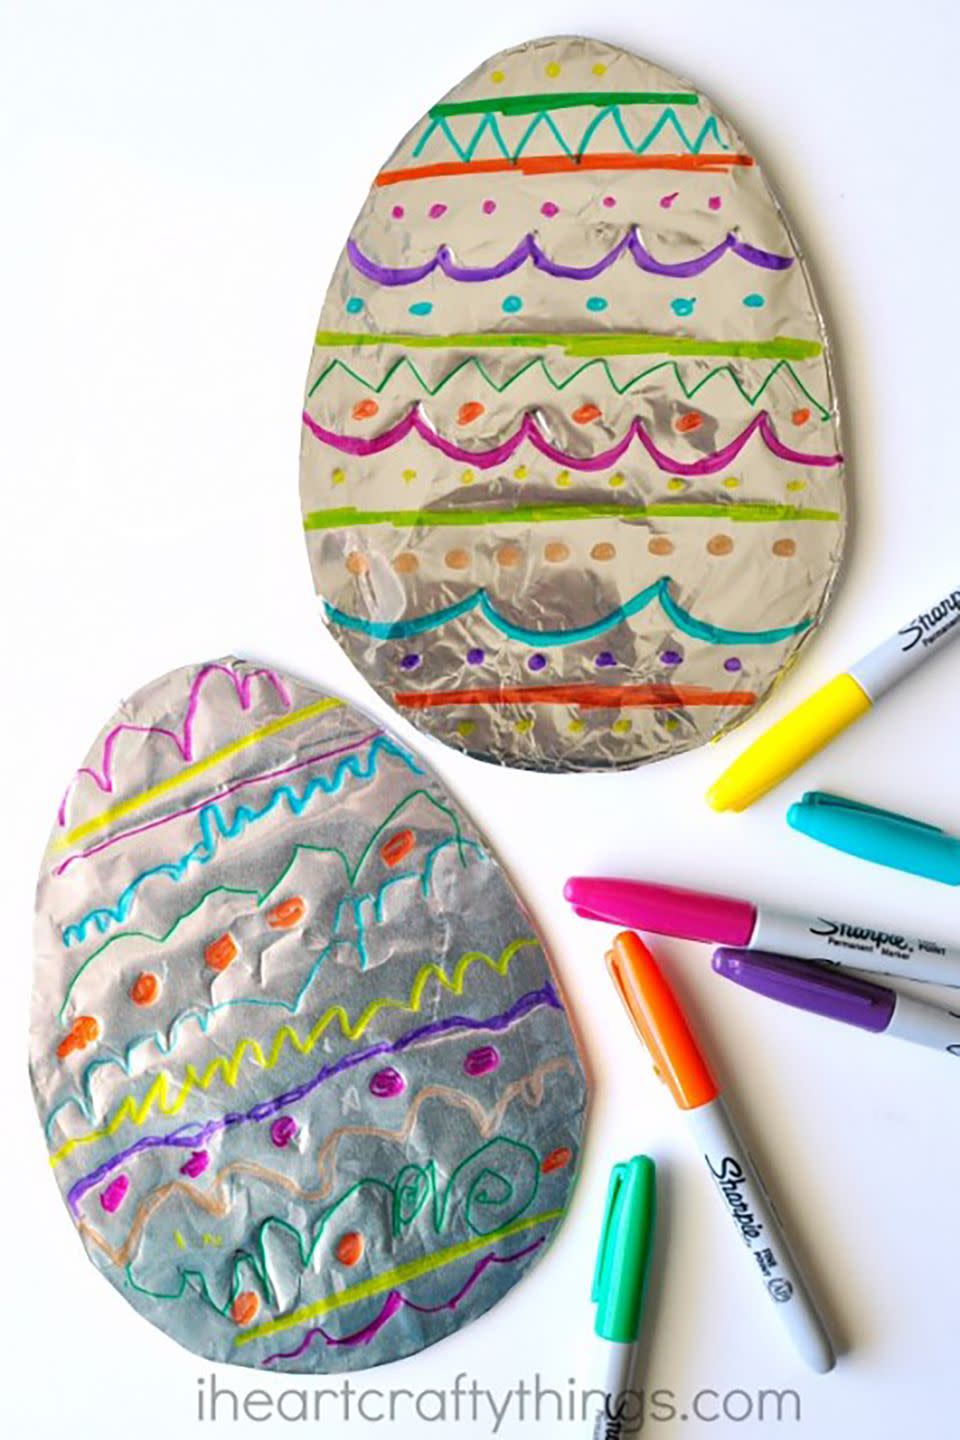
Tin Foil Easter Eggs
With cardboard, foil, and different colored Sharpies, your kids can let their creativity shine by decorating their own Easter eggs.
Get the tutorial at I Heart Crafty Things.
Paper Strip Easter Egg Tutorial
Let your little one arrange strips of colorful paper to create this beautiful, minimalistic Easter art for your home.
Get the tutorial, created by Mer Mag, at Minted.

Easter Candy Huggers
Let kids cut out their favorite animal shapes (or download Lia Griffith's here), then place a candy on them to gift to friends or teachers.
Get the tutorial at Lia Griffith.

Easter Bunny Ears
To stitch up one of these kid-friendly accessories, you'll need a child-size headband and 11⁄2 yards of 1⁄2-inch-wide double- fold bias tape.
Step 1: Cut an 18.5-inch-long piece of bias tape. Hem the cut ends under 1⁄2 inch on each side, then stitch together the long side to form a casing. Fold the casing in half so that the ends touch and use a straight pin to mark the fold's center.
Step 2: Feed an extra-thick, 12-inch-long pipe cleaner through one end of the casing, stopping at the pin. Feed a second pipe cleaner through the casing's other end until it, too, meets the pin; remove pin. Bring the casing's open ends toward each other and twist the exposed pipe cleaners together to form a rabbit ear shape. Repeat steps one and two to make a second ear.
Step 3: Cut a piece of bias tape the length of the headband, plus one extra inch. Wrap the tape over the headband, then use pins to mark the two spots where you want to attach the ears (use the photo at left for guidance).
Step 4: Remove the tape from the headband and stitch the long side together, from the pins out to both ends of the tape; stitch these ends closed, and remove pins. Twist the ears' pipe-cleaner ends around the headband in the desired spots, then slide each end of the headband into the casing. Use a needle and thread to slip-stitch the tape around and between the ears closed.

You Might Also Like

