
PSA: No, You Don't Need to Baste Your Turkey
"Hearst Magazines and Yahoo may earn commission or revenue on some items through the links below."
Most of the recipes we cook annually for Thanksgiving dinner aren’t all that complicated. You’ve got your go-to green bean casserole and you could practically make mashed potatoes in your sleep. But there’s one dish that we’re always getting questions about, especially as the big day approaches: The all-important, yet ever-intimidating, Thanksgiving turkey. So we rounded up our best turkey cooking tips, including how to season a turkey, what mistakes to avoid and how to cook a turkey without drying it out (yes, it’s possible!), to ensure that the star of your dinner can truly shine.
Choose the right size turkey
If you’re buying a whole turkey, plan on 1 pound (uncooked) per person. For a boneless turkey breast, get ½ pound per person. Feeding an army? Rather than buying the biggest bird you can find (which can be tricky to cook evenly while retaining moisture), get two smaller turkeys or one whole turkey and one breast. These generous estimates will likely leave you with delicious Thanksgiving leftovers to enjoy when all that hard work is over.
Plan for the long thaw
According to the USDA, the safest way to thaw turkey is in the refrigerator. This is also our Test Kitchen’s preferred method because it’s the most hands-off and results in an evenly defrosted bird that’s ready to roast. So, how long does it take to thaw a frozen turkey in the refrigerator? You want to allow 1 day in the fridge for every 4 pounds of turkey, so refrigerate a 12-pound bird for 3 days, a 20-pound bird for 5 days, and so on.
Dry brine or bust
Thanksgiving turkey is something we wait all year to eat, but it often comes out dry and flavorless, merely a vehicle for gravy. Dry brining is the best way to ensure the turkey is seasoned all the way through (not just on the surface), the skin gets extra crispy, and the turkey retains its moisture. All you really need to dry brine a turkey is salt; just rub salt all over the raw turkey, place the turkey into a large plastic bag (you may need 2) and refrigerate overnight or up to 2 days before cooking.
Skip the stuffing
Instead of packing your bird with bread cubes that inevitably turn soggy, the Test Kitchen prefers stuffing recipes baked outside of the bird, in a deep casserole dish, as the safest (and tastiest!) option. Not only does this ensure that the stuffing avoids contact with raw turkey, but the final product is a deliciously moist, crisp-topped creation that your guests won't be able to get enough of!
Add aromatics
While salt works well to bring the flavor out of bland turkey, there are a few ways to add even more oomph. Most herbs you might have on hand during Thanksgiving (rosemary, thyme, sage, etc.) will work great. Since you’re not stuffing the bird, add those herbs into the cavity of the bird (about 12 sprigs total), along with a quartered onion. If you have an extra head of garlic, cut it in half and pop that in (skin and all!), too. You can also add a halved lemon or small orange. As the turkey roasts, the seasonings in the cavity will flavor the rest of the bird.
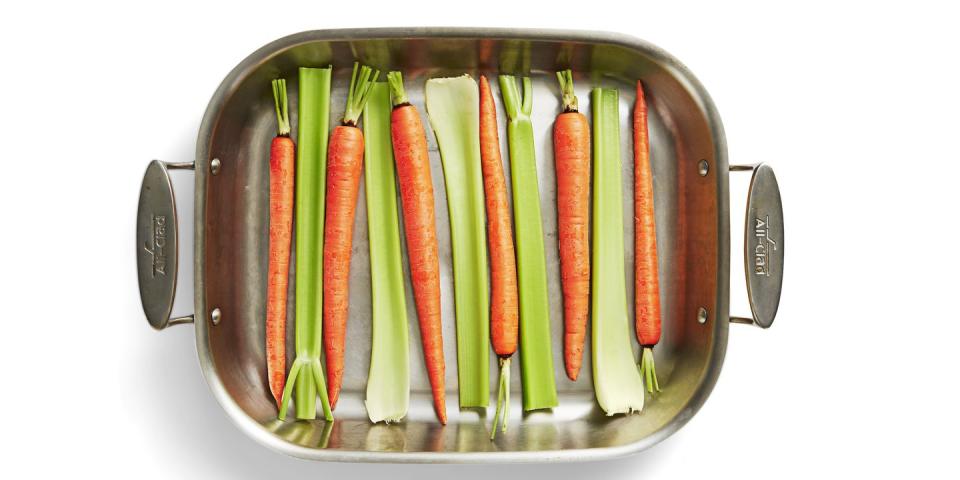
Use a roasting rack
The roasting rack helps keep the bottom of your turkey from steaming and sticking to the bottom of the pan. No rack? No worries! Just cut onions into 3/4-inch thick slices, arrange in two parallel rows, and place the bird on top. Or, try this trick from our 1968 issue: Create a bed of celery stalks and carrots to elevate your roast — and you'll have extra flavorful veggies to use later, too.
Forget about basting
While it is true that basting can help to keep the turkey evenly brown, it has little — if anything! — to do with keeping the bird moist and juicy. In fact, opening the door for frequent basting lowers the oven temperature, which may prolong the overall turkey cooking time. Instead, we rub the bird with olive oil and butter before roasting, which helps produce that crisp, golden brown skin.
Take its temperature
Roasting a turkey is not something most of us do regularly and tricks like jiggling the leg, using the 15-minutes-a-pound rule, or even keeping your eye on that plastic popper are just not exact enough to make sure you don't get all of your guests sick. All sorts of factors from fridge temperature to oven accuracy will affect how long to cook a turkey. An instant read thermometer is your friend here. You can know that your turkey is done cooking when you insert a meat thermometer into the thickest part of its thigh (without touching the bone) and the temperature reads 165°F. Its juices should also run clear when part of its thigh is pierced with the tip of a knife.
Let it rest
Letting the bird, or any piece of meat, rest allows the juices (a.k.a. moisture) to redistribute. If you carve too soon, the liquid will be mostly on the cutting board and your meat will be dry. So, don't make the mistake of rushing the resting period. When you take it out of the oven, carefully tilt the turkey to empty the juices from the cavity into the pan (you'll want to save these juices for your gravy). Transfer the turkey to a carving board set within a rimmed baking sheet. This will catch the bird's juices while it rests and as you're carving, which you can also add to your gravy (and won't have to mop off the floor!). Cover loosely with foil and let the turkey rest at least 30 minutes before carving.
Do not carve the turkey at the table
Yes, that's how they do it in the movies — but, unless you have a resident surgeon who wants to show off their skills, it's better to carve your turkey in the kitchen. For our foolproof turkey carving method, follow these steps:
First, remove the twine. Then, remove the legs. Cut down in between where the leg meets the breast to remove the entire leg. Transfer to another cutting board. Repeat with the other leg.
Next, remove the breast and the wing. Cut along one side of the breast bone and using the non-knife hand, gently pull the breast meat away from the bone. Cut as closely to the bone and ribs as possible, and then cut through the wing joint. Transfer to the other cutting board.
Separate the drumsticks from the thighs. Transfer the drumsticks to a platter. Remove the thigh bones, then slice the thigh meat and transfer to the platter. Remove the wings from the breasts and transfer to the platter, if your family and guests like the wings.
Now, all that's left is the breast. Slice the turkey breast crosswise (against the grain), and arrange on the platter.
Garnish with herbs and fresh fruit (oranges, clementines, figs, or grapes) for an equally pretty presentation. Try roasted pears for extra juiciness or caramelized winter vegetables for earthy sweetness. Small, sweet champagne grapes are also fun to munch on in between bites of savory turkey.
You Might Also Like

